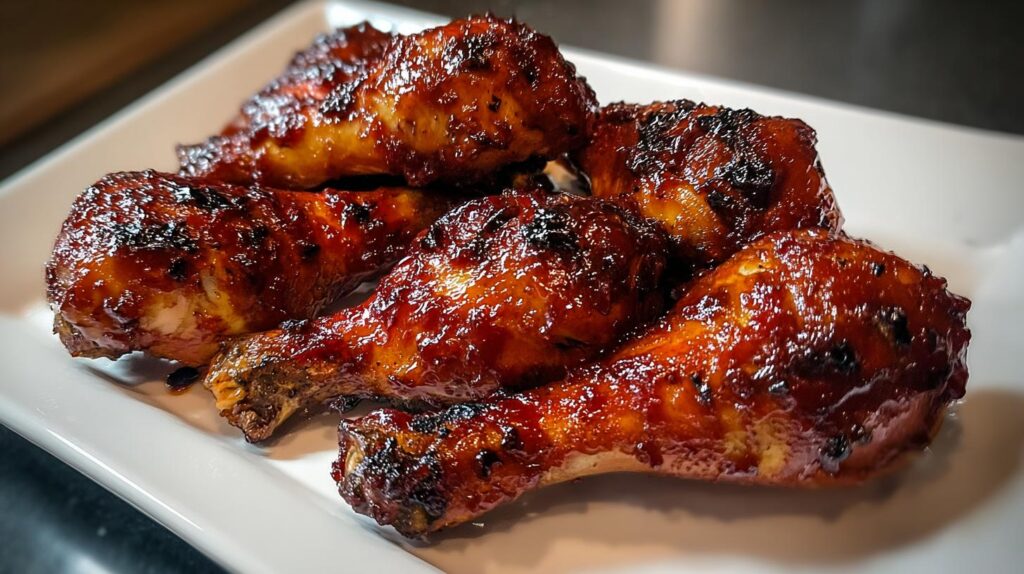
Let me tell you about my absolute favorite way to win at weeknight dinners – these ridiculously good sticky BBQ chicken drumsticks. I’ve been making this exact recipe for years, ever since my cousin’s backyard BBQ where I first discovered the magic of that sweet-smoky glaze clinging to crispy-skinned chicken. Now it’s my go-to when I need something that’s both stupid-easy and guaranteed to disappear fast from the plate. The secret? A simple spice rub that forms the perfect crust, then that luscious glaze you’ll want to eat with a spoon (no judgment if you do). Trust me, once you try these baked beauties, you’ll understand why my kids start cheering when they smell them in the oven.
Why You’ll Love These Sticky BBQ Chicken Drumsticks
Listen, I know we all need those “hero” recipes that save the day, and these drumsticks are mine. Here’s why you’re going to adore them:
- Effortless prep: 10 minutes of hands-on time? That’s less than it takes to argue with my toddler about putting on shoes.
- One-pan wonder: Bake ’em right on a rack – minimal cleanup means more time for important things (like eating).
- Crowd-pleaser magic: That sweet-smoky glaze makes even picky eaters lick their fingers.
- Weeknight warrior: Hands-off baking time = perfect for multitasking (or pretending to fold laundry).
Seriously, these have saved my sanity on more busy nights than I can count. The leftovers? Even better cold straight from the fridge – not that there’s ever any left.
Ingredients for Sticky BBQ Chicken Drumsticks
Here’s everything you’ll need to make these finger-licking-good drumsticks – I promise it’s all simple stuff you probably have already:
- For the chicken:
- 8 chicken drumsticks (about 2½–3 lbs total)
- 1 Tbsp olive oil (or whatever neutral oil you’ve got)
- 1 tsp each: kosher salt, black pepper, garlic powder, onion powder
- 1 tsp smoked paprika (trust me, this makes all the difference)
- ½ tsp chili powder (optional, but adds nice warmth)
- For that killer glaze:
- ¾ cup BBQ sauce (your favorite brand or homemade)
- 2 Tbsp honey or packed brown sugar
- 1 Tbsp apple cider vinegar (cuts the sweetness perfectly)
- 1 tsp Worcestershire sauce (that umami bomb!)
- ½ tsp smoked paprika (extra smoky goodness)
Ingredient Substitutions & Notes
No stress if you need to swap things – I’ve tested all these variations:
- Sweetener: Maple syrup works instead of honey/brown sugar in a pinch
- Heat level: Use spicy BBQ sauce or add cayenne if you like it hot
- Gluten-free: Just check your BBQ sauce and Worcestershire labels
- No chili powder? Skip it or use a dash of cayenne
- Vinegar: White vinegar or lemon juice substitutes fine
Pro tip: The glaze thickens as it cools, so don’t panic if it seems thin at first!
Equipment Needed for Sticky BBQ Chicken Drumsticks
Grab just a few basic tools – nothing fancy required here! You’ll need:
- A sturdy baking sheet (half-sheet pan is perfect)
- Wire rack (the secret to crispy skin all around!)
- Aluminum foil (for easy cleanup – I never skip this step)
- Silicone brush (or even a spoon works in a pinch)
Nice-to-have but not essential: an instant-read thermometer to check for that perfect 165°F doneness. Though honestly, I often just eyeball it when the glaze looks beautifully caramelized.
How to Make Sticky BBQ Chicken Drumsticks
Okay, let’s get these beauties cooking! I promise it’s easier than you think – just follow these simple steps for drumsticks that’ll have everyone begging for seconds.
Step 1: Season the Drumsticks
First things first – pat those drumsticks dry with paper towels. This is KEY for getting that perfect crispy skin! Toss them in a big bowl with the olive oil until they’re nicely coated. Now sprinkle all those gorgeous spices (salt, pepper, garlic powder, onion powder, smoked paprika, and chili powder if you’re using it) and massage them in like you’re giving the chicken a little spa treatment. Get every nook and cranny!
Step 2: Bake and Glaze
Arrange your seasoned drumsticks on the wire rack (don’t crowd them!) and pop them in your preheated 425°F oven for 25 minutes. Meanwhile, whisk together that irresistible glaze – BBQ sauce, honey, vinegar, Worcestershire, and extra smoked paprika. After the first bake, brush that sticky goodness all over the drumsticks. Bake another 15 minutes, flip ’em, glaze again, then go for 10-15 more minutes until they’re gorgeously caramelized and hit 165°F inside. Want extra drama? Crank the broiler for 1-2 minutes at the end!
Step 3: Rest Before Serving
Here’s the hardest part – resist the urge to dive right in! Let those juicy drumsticks rest for 5 minutes. This lets the juices redistribute so every bite is perfection. Trust me, it’s worth the wait.
Tips for Perfect Sticky BBQ Chicken Drumsticks
After making these drumsticks more times than I can count, here are my can’t-live-without tips:
- Wire rack is non-negotiable: It lets heat circulate for crispy skin all around – no soggy bottoms!
- Temperature matters: 165°F at the thickest part means juicy, safe chicken every time.
- Glaze thickness: Too thick? Add a splash of water. Too thin? Simmer it down.
- Broiler trick: Watch closely, but 2 minutes gives you those gorgeous charred edges.
- Patience pays: Letting them rest means juices stay put instead of running everywhere.
Oh, and wear an apron – that glaze gets everywhere when you’re flipping!
Serving Suggestions for Sticky BBQ Chicken Drumsticks
These drumsticks deserve a proper supporting cast! My go-to pairings:
- Crisp, tangy coleslaw (cuts through the richness)
- Buttery cornbread (for soaking up every last drop of glaze)
- Grilled corn or zucchini (that smoky flavor match made in heaven)
- Simple baked beans (because BBQ demands them)
Paper towels on the table are mandatory – things get gloriously messy!
Storing and Reheating Sticky BBQ Chicken Drumsticks
Here’s the deal – these drumsticks rarely last long enough to store, but when they do (miracle of miracles!), here’s how to keep them tasting amazing:
- Fridge: Store in an airtight container for 3-4 days. The glaze actually gets more flavorful!
- Reheating magic: 350°F oven or air fryer for 8-10 minutes brings back that crispiness. Microwaving works in a pinch, but expect softer skin.
- Freezing: Not ideal – the glaze texture changes, but still edible for up to 2 months.
Pro tip: If reheating in the oven, brush with a tiny bit of fresh BBQ sauce to revive that sticky shine!
Nutritional Information for Sticky BBQ Chicken Drumsticks
Just a heads up – these numbers are estimates since brands and ingredient swaps can change things. Each serving (about 2 drumsticks) packs plenty of protein with that sweet-smoky goodness we all love. As my grandma used to say, “Good food feeds the soul first!”
FAQs About Sticky BBQ Chicken Drumsticks
Can I use chicken thighs instead of drumsticks?
Absolutely! Thighs work beautifully – just increase baking time by 5-10 minutes since they’re meatier. The glaze clings perfectly to that juicy dark meat.
How do I make these gluten-free?
Easy peasy! Just double-check your BBQ sauce and Worcestershire labels. Most major brands have GF options these days. I like using Stubbs or Sweet Baby Ray’s GF versions.
Can I grill these instead of baking?
You bet! Grill over medium heat (about 350°F) for 25-30 minutes, turning and glazing every 5-7 minutes. That smoky char takes these to another level!
Why won’t my glaze stick to the chicken?
Patience, friend! Make sure to pat the drumsticks dry first, and wait until after the initial bake before glazing. The heat helps the sauce adhere better.
Can I prep these ahead?
Totally! Season the drumsticks up to 24 hours ahead (keep refrigerated). The glaze can be made 3 days in advance – just warm slightly before using.
Irresistible Sticky BBQ Chicken Drumsticks in 3 Easy Steps

Sticky BBQ Chicken Drumsticks are a flavorful and easy-to-make dish with a sweet and smoky glaze. Perfect for family dinners or gatherings.
- Prep Time: 10 minutes
- Cook Time: 55 minutes
- Total Time: 1 hour 5 minutes
- Yield: 4 servings 1x
- Category: Main Dish
- Method: Baking
- Cuisine: American
- Diet: Low Lactose
Ingredients
- 8 chicken drumsticks (about 2 1/2–3 lbs)
- 1 Tbsp olive oil
- 1 tsp kosher salt
- 1 tsp black pepper
- 1 tsp garlic powder
- 1 tsp onion powder
- 1 tsp smoked paprika
- 1/2 tsp chili powder (optional for heat)
- 3/4 cup BBQ sauce (your favorite)
- 2 Tbsp honey or brown sugar
- 1 Tbsp apple cider vinegar
- 1 tsp Worcestershire sauce
- 1/2 tsp smoked paprika (optional, extra smoky)
Instructions
- Preheat oven to 425°F. Line a baking sheet with foil and place a wire rack on top. Spray rack with nonstick spray.
- Pat drumsticks dry. Toss with olive oil, salt, pepper, garlic powder, onion powder, smoked paprika, and chili powder.
- Arrange drumsticks on the rack. Bake 25 minutes.
- Whisk BBQ sauce, honey (or brown sugar), vinegar, Worcestershire, and smoked paprika.
- Brush drumsticks with glaze. Bake 15 minutes, flip, brush again, then bake 10–15 minutes more until sticky, caramelized, and 165°F internal temp.
- Optional: Broil 1–2 minutes for darker edges. Rest 5 minutes before serving.
Notes
- For extra crispy skin, use a wire rack.
- Adjust chili powder for desired heat level.
- Ensure internal temperature reaches 165°F for safety.
Nutrition
- Serving Size: 2 drumsticks
- Calories: 510
- Sugar: 20g
- Sodium: 800mg
- Fat: 25g
- Saturated Fat: 7g
- Unsaturated Fat: 15g
- Trans Fat: 0g
- Carbohydrates: 30g
- Fiber: 1g
- Protein: 40g
- Cholesterol: 150mg
Keywords: sticky bbq chicken drumsticks, baked bbq drumsticks, grilled chicken drumsticks, oven baked chicken legs, bbq glaze chicken, easy chicken drumsticks