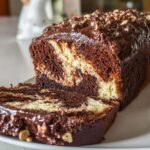
Oh my gosh, do I have a story for you about my Marbled Chocolate Crunch Cake! Picture this: It’s Sunday morning, sunlight streaming through the kitchen window, and my whole family is gathered around the table in their pajamas. I pull this gorgeous loaf out of the oven – you can actually see the chocolate swirls peeking through the golden crust. And then comes the magic part…
I pour over that warm chocolate topping (I always use milk chocolate because that’s what my kids love), and as it starts to set, I sprinkle on crushed hazelnuts. The second that topping cracks under your fork? Absolute perfection. That satisfying crunch gives way to the moistest marbled crumb you’ve ever tasted. It’s become our family’s go-to brunch centerpiece – way better than boring old pancakes if you ask me!
What makes this cake so special? It’s that perfect balance of textures – the crunchy chocolate shell against the soft, buttery cake with those beautiful cocoa swirls running through it. And here’s my secret: the marbling looks fancy but is actually foolproof. Just wait till you see how easy it is to create those gorgeous patterns with a simple butter knife!
Why You’ll Love This Marbled Chocolate Crunch Cake
Trust me, this isn’t just another loaf cake—it’s the kind of dessert that makes people sneak second slices when they think no one’s looking. Here’s why it’s become my most requested recipe:
- That irresistible crunch: The chocolate shell studded with hazelnuts shatters beautifully, giving way to the softest marbled crumb underneath.
- Foolproof marbling: My swirl technique takes 30 seconds with a butter knife—no fancy skills needed!
- Brunch superstar: Slices like a dream and pairs perfectly with coffee, making it ideal for lazy weekend mornings.
- Kid-approved magic: The chocolate-on-chocolate action means even picky eaters gobble it up.
- Two textures in one bite: Creamy melted chocolate meets crunchy nuts—it’s like having dessert and candy at once!
Seriously, the way the aromas of vanilla and cocoa fill your kitchen while it bakes? Worth waking up early for.
Ingredients for Marbled Chocolate Crunch Cake
Okay, let’s talk ingredients! The magic of this cake comes from simple, quality stuff—nothing fancy, but each item plays a specific role. Pro tip: set your butter and eggs out an hour before baking. Cold butter won’t cream properly, and room-temp eggs blend smoother into the batter. Here’s what you’ll need, grouped by where they shine:
For the Cake Batter:
- 1 cup (225g) unsalted butter, softened – This means room temperature, people! When you press it, your finger should leave an indent without sinking straight through. No microwave shortcuts—trust me, I’ve tried.
- 1 cup (200g) granulated sugar – Regular white sugar works best here. Brown sugar would overpower the delicate swirls, but hey, if you’re rebellious, use half brown for a caramel note.
- 4 large eggs (~50g each) – Size matters! Too small, and your cake won’t rise right. Crack them into a separate bowl first—never risk a bad egg ruining your whole batch.
- 2 cups (250g) all-purpose flour – Spoon it into your measuring cup, then level it off. Packing flour = dense hockey pucks, not cake.
- 2 tsp baking powder – Freshness check: if it doesn’t fizz when you drip water on it, toss it. Old baking powder means sad, flat cake.
- 1/2 cup (120ml) whole milk – The fat content keeps things tender. Skim milk? Not in Grandma’s kitchen, and not in mine.
- 1 tsp vanilla extract – Splurge on the real stuff. That “imitation” vanilla has no place near this masterpiece.
- 1/4 cup (20g) unsweetened cocoa powder – Dutch-processed gives deeper color, but natural works too. Just no hot chocolate mix—that’s a war crime in baking.
For the Crunchy Topping:
- 7 oz (200g) milk chocolate – Chop it roughly so it melts evenly. Dark chocolate lovers? Go for 70%—it balances the sweet cake beautifully.
- 1/2 cup (60g) crushed hazelnuts OR puffed rice cereal – Toast the hazelnuts first for maximum flavor. Puffed rice gives that fun “crispy bar” texture.
- 1 tbsp neutral oil (optional) – A tiny bit of vegetable or coconut oil makes the topping glossy and easier to spread. Skip it if you like thicker, snap-able chocolate.
See? Nothing weird or hard-to-find. Now, who’s ready to swirl?
How to Make Marbled Chocolate Crunch Cake
Alright, let’s get to the fun part—making that gorgeous marbled magic happen! I promise, this isn’t as tricky as it looks. Just follow these steps, and you’ll have a showstopper cake that’ll make everyone think you spent hours in the kitchen.
Preparing the Batter
First things first: grab that softened butter and sugar. Toss them into your mixing bowl and beat them like they owe you money—you want them pale, fluffy, and totally combined. This should take about 3 minutes with a hand mixer. Scrape down the sides halfway through; those sneaky butter clumps love to hide there!
Now, add your eggs one at a time, mixing well after each. I know it’s tempting to dump them all in, but patience pays off here. You’ll get a smoother batter, and your cake will rise evenly. Once the eggs are incorporated, alternate adding your dry ingredients (flour + baking powder) with the milk. Start and end with the dry stuff—this keeps the batter from getting too heavy or lumpy. Stir just until combined; overmixing makes tough cake, and nobody wants that.
Creating the Marvelous Marble Effect
Here’s where the real fun begins! Scoop out about one-third of your batter into a separate bowl. Sift in the cocoa powder and mix until it’s fully blended—no chocolatey streaks left behind. Now, the artistic part: drop alternating spoonfuls of the vanilla and chocolate batters into your greased loaf pan. Don’t worry about being perfect; randomness creates the best marbling!
Take a butter knife and swirl it through the batter in a figure-8 pattern. Just 3-4 passes—any more, and you’ll lose those beautiful ribbons of chocolate. The batter should look like a delicious abstract painting. Pro tip: lift the knife slightly as you swirl to create those dramatic streaks that’ll peek through the crust.
Baking and Cooling (The Hardest Part!)
Pop that beauty into a 350°F (175°C) oven that you’ve preheated—no cheating here! The cake needs that instant heat to rise properly. Bake for 45-50 minutes, but start checking at 40. The toothpick test is your best friend: it should come out with a few moist crumbs, not wet batter. The top should be golden, and the edges will just start pulling away from the pan.
Now, the toughest test of your willpower: let it cool completely in the pan. I know, I know—that chocolatey aroma is torture. But if you try to add the topping now, you’ll end up with a melty mess. About 2 hours should do it. Use this time to clean up… or just stare lovingly at your creation through the oven door.
Adding That Irresistible Crunch Topping
Time for the grand finale! Melt your chocolate gently—either in short microwave bursts (stirring every 15 seconds) or over a double boiler. Stir in that optional oil if you want extra shine. Then, fold in your toasted hazelnuts or puffed rice. The mixture should be thick but pourable—like warm fudge sauce.
Pour it over your cooled cake, using a spatula to nudge it toward the edges. Let it drip down the sides artfully; those rustic chocolate drips are what make it look homemade (in the best way). Now, the final wait: chill for at least 30 minutes until the topping sets into that perfect, crackable shell. Try not to hover by the fridge—I speak from experience!
When it’s time to slice, run your knife under hot water first for clean cuts. That first bite through the crisp chocolate into the soft, swirled cake? Pure bliss. You did it!
Tips for the Perfect Marbled Chocolate Crunch Cake
After making this cake more times than I can count (okay fine, my jeans can tell you exactly how many), I’ve learned a few tricks to guarantee bakery-worthy results every time. These are the little things that make all the difference between “good” and “OMG I need this recipe!”
- Butter and eggs MUST be room temp – I can’t stress this enough. Cold butter won’t cream properly, and chilly eggs make the batter curdle. If you forgot to take them out, here’s my cheat: cut butter into chunks and microwave in 5-second bursts (just until slightly soft, not melted). For eggs, soak them in warm water for 5 minutes.
- Swirl with restraint – That butter knife is not a mixer! Three to four gentle figure-8 motions max. Overdo it, and you’ll end up with muddy batter instead of those Instagram-worthy swirls. Less is more here, folks.
- Chill the topping properly – I know you want to dig in immediately, but that chocolate needs at least 30 minutes in the fridge to set into that signature crunch. For extra snap, leave it overnight—the contrast between crisp shell and soft cake is worth the wait.
- Slice with a hot knife – Run your knife under hot water and dry it quickly before each cut. The heat glides right through the chocolate topping without cracking it. My mom taught me this trick after my first crumbly disaster!
- Bake until “just done” – The toothpick should have a few moist crumbs, not come out clean. Overbaking dries out the cake, especially since it continues cooking slightly as it cools. When in doubt, pull it out—better slightly under than over.
Oh! One last thing—if your kitchen is warm, pop the cake back in the fridge for 10 minutes before serving. That chocolate topping stays crisp, and the flavors actually intensify when slightly chilled. Try it and thank me later!
Ingredient Substitutions & Notes
Listen, I get it—sometimes you’re staring into your pantry like, “Do I really need to run to the store?” Fear not! This cake is surprisingly flexible. Here are my tried-and-true swaps that still deliver that signature marbled crunch magic (plus a few insider tips):
When Life Gives You… Alternative Ingredients
- Out of milk? Buttermilk adds tangy richness, or use plain yogurt thinned with a splash of water. Even coconut milk works in a pinch—just shake the can well!
- Dark chocolate fan? Swap the milk chocolate for 70% dark in the topping. Bonus: it pairs beautifully with sea salt flakes sprinkled on top.
- Nut allergies? Skip the hazelnuts and use puffed rice for crunch, or try sunflower seeds for texture. Crushed pretzels? Don’t mind if I do—salty-sweet heaven!
- No vanilla extract? Almond extract (just 1/2 tsp!) gives a lovely twist, or scrape a vanilla bean if you’re feeling fancy.
The Oil Situation: To Add or Not to Add?
That optional tablespoon of oil in the topping? Here’s the deal: it gives you a glossier, more “professional” looking finish and makes spreading easier. But if you prefer that thick, snap-able chocolate layer (my husband’s favorite), leave it out. The oil also helps prevent white streaks if your chocolate gets too hot—a little baking chemistry for you!
Pro Tips for Ingredient Success
- Cocoa powder: If you only have sweetened hot cocoa mix, use it but reduce the sugar in the batter by 2 tbsp. Your swirls will be lighter, but still delicious.
- Butter substitutes: In emergencies, margarine works (Grandma gasps), but reduce salt elsewhere. Coconut oil makes a denser cake—best for tropical vibes!
- Egg shortages: For each egg, mix 1 tbsp ground flaxseed + 3 tbsp water. Let it sit until gooey. Not quite the same, but works in a bind.
Remember: baking is part science, part art. The first time I made this with almond milk and dark chocolate, I worried it wouldn’t work—but my neighbor still begged for the recipe! So breathe, improvise, and trust the process. Worst case? You get delicious “mistakes” to eat while trying again.
Serving & Storage
Here’s the best part – this cake somehow tastes amazing no matter how you serve it! My personal favorite? A thick slice still slightly chilled from the fridge with a steaming mug of strong coffee. That contrast of cool, crunchy chocolate against hot, bitter coffee? Absolute perfection. For dessert, warm it for 10 seconds (just enough to make the chocolate topping glisten) and top with vanilla ice cream that melts into those marble swirls.
Now, let’s talk storage because I know you’ll want to keep this beauty around (if it lasts that long!). Room temperature is fine for about 2 days if you keep it in an airtight container – but honestly, I always stash mine in the fridge. The cold keeps that topping crisp and the cake stays moist for up to 5 days. Pro tip: slide a piece of parchment between slices so they don’t stick together.
One warning – if you leave it out too long, especially on a warm day, that gorgeous chocolate shell will start to soften. Still delicious, but you lose that signature crunch. If this happens to you (no judgment – my kids “accidentally” leave the cake dome open all the time), just pop it back in the fridge for 30 minutes to reset the texture.
Marbled Chocolate Crunch Cake FAQs
I’ve gotten so many questions about this cake over the years—here are the ones that pop up most often, along with my hard-won baking wisdom!
Can I freeze this cake?
Absolutely! But here’s my trick: freeze it before adding the chocolate topping. Wrap the cooled, unfrosted loaf tightly in plastic, then foil. It’ll keep for 3 months. Thaw overnight in the fridge, then add fresh topping—that way your crunch stays perfect!
Help! My cake turned out dry—what went wrong?
Oh honey, we’ve all been there. Usually it means:
- Overbaking (pull it at 45 minutes and check!)
- Overmixing the batter (stop when just combined)
- Old baking powder (test it with hot water first)
Next time, try brushing the cooled cake with simple syrup before topping—my secret rescue move!
Can I skip the nuts?
Of course! Puffed rice cereal gives that fun crispy texture, or try:
- Toasted coconut flakes
- Crushed pretzels (salty-sweet magic!)
- Sunflower seeds for nut-free crunch
Just keep the total add-ins to about 1/2 cup so the topping still sets properly.
Why did my chocolate topping turn streaky?
That’s usually from overheating the chocolate (it “seizes”). Next time:
- Melt in 15-second bursts, stirring between
- Add that 1 tbsp oil—it helps stabilize
- Let it cool slightly before pouring
Streaks still taste amazing, so don’t stress!
Can I make this in a round pan?
You bet! A 9-inch round works great—just reduce baking time to 35-40 minutes. The marbling looks gorgeous when sliced into wedges. Pro tip: use a springform pan if adding topping—easier removal!
Still got questions? Slide into my DMs—I love troubleshooting baking adventures! Nothing makes me happier than seeing your marbled masterpieces.
Nutritional Information
Alright, let’s keep it real—this is dessert, not a salad! But because I know some of you like to track these things (or need to justify that second slice), here’s the general nutritional scoop. Remember, these are estimates based on my exact recipe with hazelnuts—your ingredients might vary slightly. And hey, cake is about joy, not numbers!
Per generous slice (1/10th of the loaf): You’re looking at a treat that’s rich in happiness and cozy weekend vibes. The cake gets its structure from quality butter and eggs, while that chocolate topping adds just enough indulgence to make it feel special.
Values are estimates and vary by ingredients/brands. Calculated for 1 slice with hazelnuts.
Now go enjoy your creation—and if you snap a pic of that gorgeous marbled crumb, tag me so I can admire your handiwork! #ChocolateCrunchMagic
Print32 Irresistible Marbled Chocolate Crunch Cake Secrets Revealed
A moist marbled loaf cake with a crunchy chocolate shell, perfect for family brunch or a sweet weekend treat.
- Prep Time: 15 minutes
- Cook Time: 50 minutes
- Total Time: 1 hour 5 minutes
- Yield: 10 slices 1x
- Category: Dessert
- Method: Baking
- Cuisine: International
- Diet: Vegetarian
Ingredients
- 1 cup unsalted butter, softened
- 1 cup granulated sugar
- 4 large eggs
- 2 cups all-purpose flour
- 2 tsp baking powder
- 1/2 cup whole milk
- 1 tsp vanilla extract
- 1/4 cup unsweetened cocoa powder
- 7 oz milk chocolate (or dark, if preferred)
- 1/2 cup crushed hazelnuts or puffed rice
- 1 tbsp neutral oil (optional, for smoothness)
Instructions
- Beat softened butter and sugar until light and fluffy.
- Add eggs one at a time, then fold in flour and baking powder. Mix in milk and vanilla.
- Divide the batter in two. Mix cocoa powder into one half. Alternately spoon each batter into a loaf pan and swirl with a knife.
- Bake at 350°F (175°C) for 45–50 minutes, or until a toothpick comes out clean. Let cool completely.
- Melt chocolate with oil (if using), stir in crushed hazelnuts or puffed rice, and pour over the loaf. Chill until set.
Notes
- For a smoother chocolate coating, use neutral oil.
- Let the cake cool completely before adding the chocolate topping.
- Store in the fridge for a firmer texture.
Nutrition
- Serving Size: 1 slice
- Calories: 340
- Sugar: 25g
- Sodium: 150mg
- Fat: 18g
- Saturated Fat: 10g
- Unsaturated Fat: 6g
- Trans Fat: 0g
- Carbohydrates: 40g
- Fiber: 2g
- Protein: 5g
- Cholesterol: 90mg
Keywords: Marble loaf cake recipe, Chocolate swirl cake, Crunchy chocolate topping, Easy marbled dessert, Hazelnut chocolate loaf, Family brunch cake idea