Oh my goodness, let me tell you about the first time I made fried mac and cheese balls for game day – they disappeared faster than my uncle Bob during dishwashing duty! There’s something magical about that crispy panko crust giving way to molten, cheesy macaroni that turns everyone into ravenous snack monsters. I’ve been making these golden beauties for years now, and they’re always the first appetizer to vanish at parties.
Trust me, once you’ve had homemade fried mac and cheese balls fresh from the fryer, you’ll never look at regular mac and cheese the same way again. The contrast between the crunchy exterior and that creamy, dreamy cheese center is downright addictive. Serve these with marinara for dipping, and you’ve got yourself the ultimate crowd-pleasing finger food that’ll have your guests begging for the recipe.
Why You’ll Love These Fried Mac and Cheese Balls
Listen, I know mac and cheese isn’t exactly a hard sell, but trust me – these fried balls take it to a whole new level. Here’s why they’re my go-to party trick:
- That CRUNCH: Panko breadcrumbs create this ridiculously satisfying crispy shell that shatters when you bite in
- Melty cheese core: The inside stays gloriously creamy thanks to our triple-cheese combo (cheddar for sharpness, mozzarella for stretch, parmesan for that umami punch)
- Perfect portioning: No messy scooping – each ball is a neat, dippable package of joy
- Crowd magnet: I’ve seen grown adults elbow each other out of the way to get to these
- Game day gold: They pair perfectly with cold beer and sports rivalries
Honestly, the only problem is making enough – I always double the batch because these disappear faster than you can say “overtime touchdown.”
The Must-Have Ingredients for Perfect Fried Mac and Cheese Balls
Okay, let’s talk ingredients – because using the right stuff makes all the difference between “meh” and “OMG!” mac and cheese balls. I’ve learned through trial and error (and a few cheesy disasters) that quality matters here. Here’s exactly what you’ll need:
- 8 oz elbow macaroni – the classic shape holds the cheese sauce perfectly
- 2 tbsp unsalted butter – for that rich, creamy roux base
- 2 tbsp all-purpose flour – our thickening agent for the cheese sauce
- 1 3/4 cups whole milk – none of that skim milk nonsense, we need the fat content!
- 1/2 tsp kosher salt + 1/4 tsp black pepper – basic but essential
- 1/2 tsp garlic powder – the secret flavor booster
- 1/4 tsp smoked paprika (optional) – adds a subtle smoky depth
- 1 1/2 cups shredded sharp cheddar – freshly grated melts better than pre-shredded
- 1 cup shredded mozzarella – for that glorious stretch
- 1/4 cup grated parmesan – our flavor powerhouse
- 1/2 cup all-purpose flour – for the coating station
- 2 large eggs, beaten – the glue that holds our panko crust on
- 1 1/2 cups panko breadcrumbs – Japanese-style for extra crunch
- 1/2 tsp Italian seasoning (optional) – gives the crust extra flavor
- Neutral oil for frying – vegetable or canola oil works best
- 1 cup marinara sauce – for dipping (homemade or good quality jarred)
- Chopped parsley for garnish – makes them look fancy!
Pro tip: Always shred your own cheese! Pre-shredded has anti-caking agents that can make your sauce grainy. And trust me – splurge on the good parmesan. It makes all the difference in that first cheesy bite.
The Right Tools for Fried Mac and Cheese Ball Success
You don’t need fancy equipment to make these crispy delights, but these basics will make your life so much easier:
- Heavy-bottomed saucepan – for that perfect cheese sauce that won’t scorch
- Cookie scoop (1.5 tbsp size) – my secret for uniform balls every time
- Dutch oven or deep fryer – maintains steady oil temperature
- Candy/deep-fry thermometer – crucial for that golden 350°F sweet spot
- Wire rack + paper towels – drains excess oil without making them soggy
- 3 shallow bowls – for the flour, egg, and panko coating station
That’s it! With just these simple tools, you’re ready to fry up some magic. Now let’s get to the fun part!
How to Make Fried Mac and Cheese Balls
Alright, let’s dive into the good stuff! Making these crispy, cheesy bites is easier than you think, but there are a few key steps you don’t want to rush. I’ve made every mistake in the book (hello, exploding cheese balls), so follow my lead for perfect results every time.
Preparing the Mac and Cheese Mixture
First, cook your elbow macaroni in well-salted boiling water until just al dente – about 1 minute less than the package says. Drain it well, but don’t rinse (we want that starch to help bind everything). Now, let’s make that luscious cheese sauce!
Melt your butter over medium heat, then whisk in the flour. Cook this roux for about a minute until it smells nutty – this cooks out the raw flour taste. Slowly pour in the milk while whisking constantly to avoid lumps. Keep whisking until it thickens enough to coat the back of a spoon, about 2-3 minutes.
Turn off the heat and stir in all those glorious cheeses until melted and smooth. Fold in the cooked macaroni, then spread the mixture into a parchment-lined baking dish. Here’s the important part – chill it uncovered for at least 45 minutes (I know, the wait is torture!). This firms up the mixture so you can shape it properly.
Forming and Coating the Balls
Once chilled, use a 1.5-tablespoon cookie scoop to portion out the mac and cheese. Roll each scoop between your palms to form smooth balls – if they’re too sticky, pop them back in the fridge for 10 minutes. Now comes the fun part – the triple coating!
Set up three shallow bowls: one with flour, one with beaten eggs, and one with panko breadcrumbs mixed with Italian seasoning. Roll each ball first in flour (tapping off excess), then dip in egg (let the excess drip off), and finally coat thoroughly in panko. Place them on a parchment-lined tray as you go.
Pro tip: Chill the coated balls for 10 minutes before frying – this helps the coating stick better and prevents the cheese from oozing out too fast.
Frying to Golden Perfection
Heat 2-3 inches of neutral oil in a heavy pot or Dutch oven to 350°F (use that thermometer!). Carefully add 4-5 balls at a time – overcrowding drops the oil temp and makes them greasy. Fry for 2-3 minutes, turning occasionally, until deeply golden brown.
Transfer to a wire rack set over paper towels to drain. Sprinkle with a pinch of salt while still hot – this little trick makes all the difference! Repeat with remaining balls, letting the oil return to 350°F between batches.
Serve immediately with warm marinara sauce for dipping. Watch them disappear faster than you can say “cheesy goodness!”
Tips for Perfect Fried Mac and Cheese Balls
After making these bad boys more times than I can count, here are my hard-earned tricks for fried mac and cheese ball success:
- Keep it cold, folks! That mac and cheese mixture needs to be thoroughly chilled before rolling – I’m talking at least 45 minutes in the fridge. Warm cheese equals melty disasters.
- Oil temperature is everything. Invest in a cheap candy thermometer – 350°F is the sweet spot. Too low = greasy balls, too high = burnt outside/raw inside.
- Work in small batches. Only fry 4-5 balls at a time so the oil temp doesn’t plummet. Patience = crispy perfection.
- Serve immediately! These are best piping hot when the cheese is molten and the crust is crispy. They’ll still taste good later, but that first bite? Pure magic.
- Salt right after frying. A tiny sprinkle when they’re fresh out of the oil makes all the flavors pop.
Follow these simple tips, and you’ll be the mac and cheese ball hero at your next gathering!
Serving Suggestions for Fried Mac and Cheese Balls
Oh, the fun part – dressing up these golden beauties for their big debut! I always serve mine with warm marinara for dipping (that tangy tomato cuts through the richness perfectly), but don’t stop there. Ranch dressing makes a killer alternative, especially with a dash of hot sauce stirred in. For game day, set out a beer flight – the crisp lager cuts through all that cheesy goodness beautifully.
Presentation tip: Stack them on a wooden board with dipping bowls nestled in between, and sprinkle with chopped parsley or grated parmesan for that “I totally meant to make it look this fancy” vibe. Toothpicks make them extra easy to grab between plays!
Storage and Reheating Instructions
Let’s be real – leftovers rarely happen with these crowd-pleasers, but if you’ve somehow got some, here’s how to keep them tasty! Store cooled fried mac and cheese balls in an airtight container in the fridge for up to 2 days. To reheat, skip the microwave (which makes them soggy) and pop them in a 375°F oven for 8-10 minutes until crispy again. The air fryer works magic too – just 3-4 minutes at 375°F brings back that perfect crunch!
Nutritional Information
Okay, let’s be real – we’re not eating fried mac and cheese balls for their health benefits! But if you’re curious, here’s the scoop (based on 3 balls per serving):
- 520 calories – hey, it’s a treat!
- 28g fat (12g saturated) – all that cheesy goodness
- 45g carbs – pasta + crispy coating
- 20g protein – cheese power!
- 680mg sodium – so maybe don’t add extra salt
Remember, these are estimates – your exact numbers might vary depending on ingredients and oil absorption. Everything in moderation, right? Now go enjoy your cheesy indulgence!
Frequently Asked Questions
I get asked about these fried mac and cheese balls ALL the time – here are the answers to the most common questions that pop up:
Can I make these ahead of time?
Absolutely! You can prepare the mac and cheese mixture up to 2 days in advance and keep it chilled in the fridge. Just scoop, coat, and fry when you’re ready to serve. The coated (uncooked) balls can also hang out in the fridge for a few hours before frying.
Can I use an air fryer instead of deep frying?
Yes! Spray the coated balls lightly with oil and air fry at 375°F for 8-10 minutes, shaking halfway. They won’t get quite as crispy as deep-fried, but still delicious. Just don’t overcrowd the basket!
What cheeses can I substitute?
While I love my cheddar-mozzarella-parmesan combo, feel free to experiment! Gouda adds smokiness, pepper jack brings heat, and fontina melts beautifully. Just keep the total cheese quantity about the same.
Why did my cheese ooze out while frying?
This usually means your oil wasn’t hot enough (use that thermometer!) or you didn’t chill the balls long enough before frying. That double-chill step is crucial!
Can I freeze these?
You can freeze the uncooked coated balls for up to a month. Fry straight from frozen, adding an extra minute or two to the cooking time.
Irresistible 3-Cheese Fried Mac and Cheese Balls Recipe

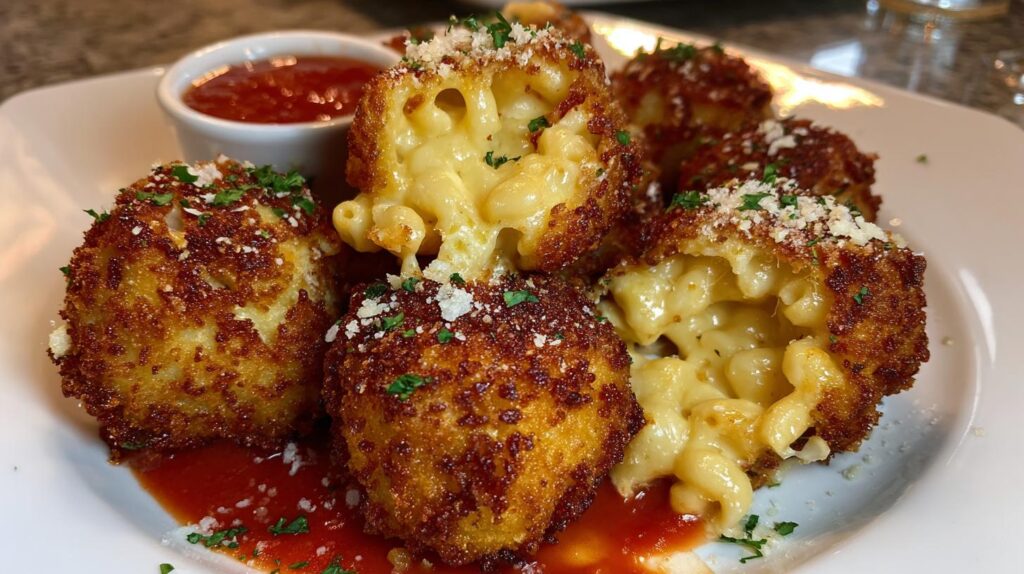
Crispy fried mac and cheese balls are a delicious cheesy appetizer perfect for game day or parties. They feature a creamy mac and cheese center coated in crispy panko breadcrumbs and fried to golden perfection.
- Prep Time: 25 minutes
- Cook Time: 15 minutes
- Total Time: 1 hour 40 minutes
- Yield: 12 balls 1x
- Category: Appetizer
- Method: Frying
- Cuisine: American
- Diet: Vegetarian
Ingredients
- 8 oz elbow macaroni
- 2 tbsp unsalted butter
- 2 tbsp all-purpose flour
- 1 3/4 cups whole milk
- 1/2 tsp kosher salt
- 1/4 tsp black pepper
- 1/2 tsp garlic powder
- 1/4 tsp smoked paprika (optional)
- 1 1/2 cups shredded sharp cheddar
- 1 cup shredded mozzarella
- 1/4 cup grated parmesan
- 1/2 cup all-purpose flour
- 2 large eggs, beaten
- 1 1/2 cups panko breadcrumbs
- 1/2 tsp Italian seasoning (optional)
- Neutral oil for frying
- 1 cup marinara sauce
- Chopped parsley for garnish
Instructions
- Cook macaroni in salted water until al dente. Drain well.
- Melt butter in a saucepan over medium heat. Whisk in flour and cook 1 minute.
- Slowly whisk in milk until smooth. Simmer 2–3 minutes until thickened.
- Stir in salt, pepper, garlic powder, and paprika.
- Turn off heat and stir in cheddar, mozzarella, and parmesan until melted.
- Fold in cooked macaroni. Spread into a shallow dish and chill until firm, about 45–60 minutes.
- Scoop and roll into 12 balls (about 2 tbsp each). Chill 10 minutes if soft.
- Coat each ball in flour, then egg, then panko mixed with Italian seasoning.
- Heat oil to 350°F. Fry in batches 2–3 minutes until golden brown.
- Drain on a paper towel–lined rack. Serve hot with marinara, parmesan, and parsley.
Notes
- Chill the mac and cheese mixture thoroughly for easier rolling.
- Use a cookie scoop for evenly sized balls.
- Fry in small batches to maintain oil temperature.
- Serve immediately for the crispiest texture.
Nutrition
- Serving Size: 3 balls
- Calories: 520
- Sugar: 5g
- Sodium: 680mg
- Fat: 28g
- Saturated Fat: 12g
- Unsaturated Fat: 14g
- Trans Fat: 0g
- Carbohydrates: 45g
- Fiber: 2g
- Protein: 20g
- Cholesterol: 120mg
Keywords: fried mac and cheese balls, crispy mac and cheese balls, panko fried mac and cheese, cheesy appetizer, marinara dipping sauce, game day snacks