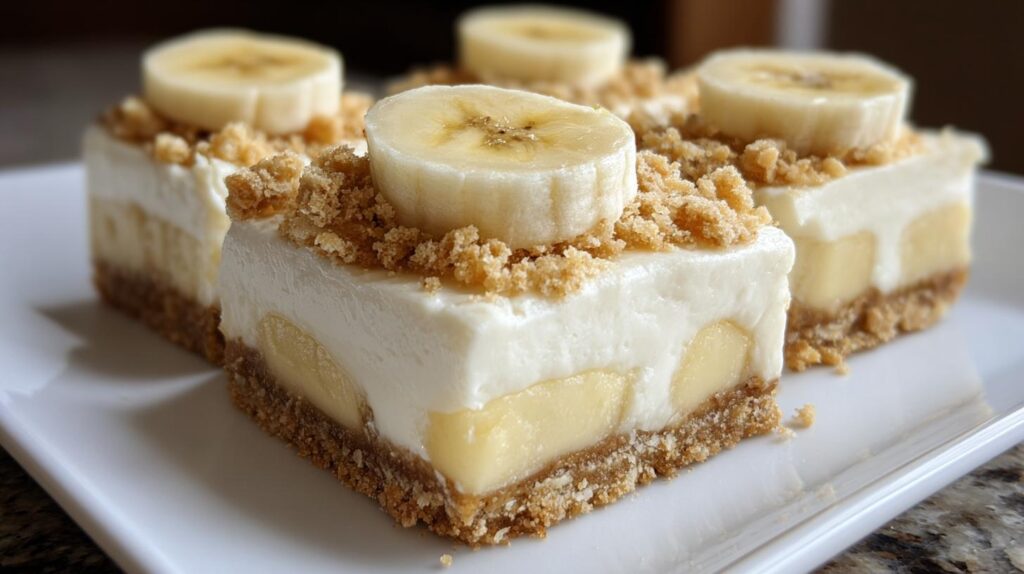
Oh my goodness, let me tell you about my absolute favorite summer lifesaver – these no-bake Banana Cheesecake Bars! Picture this: it’s 90 degrees outside, your kitchen feels like a sauna, and you need something cool, creamy, and delicious STAT. That’s when these magical bars come to the rescue. I first stumbled upon this recipe during one of those “I need dessert NOW” emergencies before a backyard BBQ, and let me tell you, they were gone faster than the kids could run through the sprinkler!
What makes these Banana Cheesecake Bars so special? Well, first off – no oven required! Just mix, chill, and boom – you’ve got the creamiest, dreamiest dessert that tastes like banana pudding and cheesecake had the most delicious baby. The graham cracker crust gives that perfect crunch, while the banana pudding filling is so light and fluffy it practically melts in your mouth. After testing this recipe more times than I can count (purely for “quality control,” of course), I can confidently say these bars hit that sweet spot between fancy enough to impress and easy enough for a weeknight treat.
Trust me, once you try these, you’ll be making them all summer long. They’re the kind of dessert that disappears from the fridge mysteriously – not that I’d know anything about midnight snack raids…
Why You’ll Love These Banana Cheesecake Bars
Let me count the ways these dreamy bars will become your new go-to dessert! After making them countless times for everything from potlucks to “just because” cravings, here’s why they never disappoint:
- No oven needed – When summer heat hits or you’re just feeling lazy (no judgment!), these no-bake banana desserts are a lifesaver
- Creamy-banana heaven – That banana pudding cheesecake filling is so velvety, it’s like biting into a cloud (a delicious, banana-flavored cloud)
- Faster than a microwave cake – 20 minutes of prep means more time for eating these easy cheesecake squares
- Party MVP – I’ve yet to meet someone who doesn’t swoon over these graham cracker crust delights
- Summer’s best friend – Chill, slice, and enjoy the ultimate creamy banana treat without breaking a sweat
Seriously, these bars check all the boxes – easy, dreamy, and guaranteed to make people ask for the recipe!
Ingredients for Banana Cheesecake Bars
Gathering your ingredients is half the fun with this recipe! Here’s everything you’ll need to make these irresistible bars – I’ve included all my little prep notes that make all the difference:
- 2 cups crushed vanilla wafers or graham crackers – I like to throw mine in a ziplock bag and roll with a rolling pin for perfect crumbs (therapeutic stress relief!)
- ½ cup melted butter – Use the real deal here, none of that margarine business
- 2 tbsp brown sugar – Packed tight in your measuring spoon for that caramel-y depth
- 16 oz cream cheese, softened – Key word: SOFTENED. Leave it out for at least an hour – no cheating with the microwave!
- 1 cup powdered sugar – Sifted if you’re fancy, straight from the bag if you’re me on a Tuesday
- 1 tsp vanilla extract – The good stuff makes all the difference
- 1 (3.4 oz) box instant banana pudding mix – Don’t grab cook-and-serve by accident!
- 1½ cups cold milk – I use whole milk for extra creaminess
- 1 cup whipped topping – Thawed if frozen, but still chilly
- 2 bananas, sliced – Wait to slice these until right before serving to keep them fresh
- Crushed vanilla wafers or granola – My secret crunch factor!
See? Nothing weird or hard to find – just pantry staples transformed into something magical!
Equipment You’ll Need for Banana Cheesecake Bars
Don’t worry – you won’t need any fancy gadgets for these beauties! Here’s what I always grab from my kitchen:
- 8×8 inch baking dish – My trusty square pan that’s seen more cheesecake bars than I can count
- Parchment paper – Lifesaver for clean removal (no stuck crust tragedies!)
- Mixing bowls – One for the crust, one for the filling – keeps things simple
- Hand mixer – Or strong arms if you’re feeling ambitious
- Spatula – For scraping every last bit of that creamy filling
That’s it! See? I told you this was easy-peasy.
How to Make Banana Cheesecake Bars
Alright, let’s get to the good stuff – making these dreamy bars! I’ve made this recipe so many times I could do it in my sleep, but I’ll walk you through each step with all my little tricks. Promise it’s easier than it looks!
Step 1: Prepare the Graham Cracker Crust
First things first – line that 8×8 pan with parchment paper, leaving some overhang on the sides. Trust me, this’ll be your best friend when it’s time to lift those bars out later! Now, mix your crushed wafers or graham crackers with melted butter and brown sugar until it looks like wet sand. Here’s my pro tip: dump it into your pan and use the bottom of a measuring cup to press it down firmly – really pack it in there! I do this in layers, pressing as I go, until I’ve got an even crust that covers the whole bottom. Pop this in the fridge while you make the filling – it helps the crust set up nice and firm.
Step 2: Make the Banana Cheesecake Filling
Now for the magic! Beat that softened cream cheese until it’s completely smooth – no lumps allowed! Add powdered sugar and vanilla, mixing until it’s creamy and dreamy. In another bowl, whisk the pudding mix with cold milk until it starts to thicken (about 2 minutes of vigorous whisking does the trick). Here’s where you need patience – gently fold the pudding into the cream cheese mixture, then fold in the whipped topping. Don’t overmix! You want to keep all that airy lightness in the whipped topping, so fold just until combined. The filling should be thick but still fluffy – like banana-scented clouds!
Step 3: Assemble and Chill the Banana Cheesecake Bars
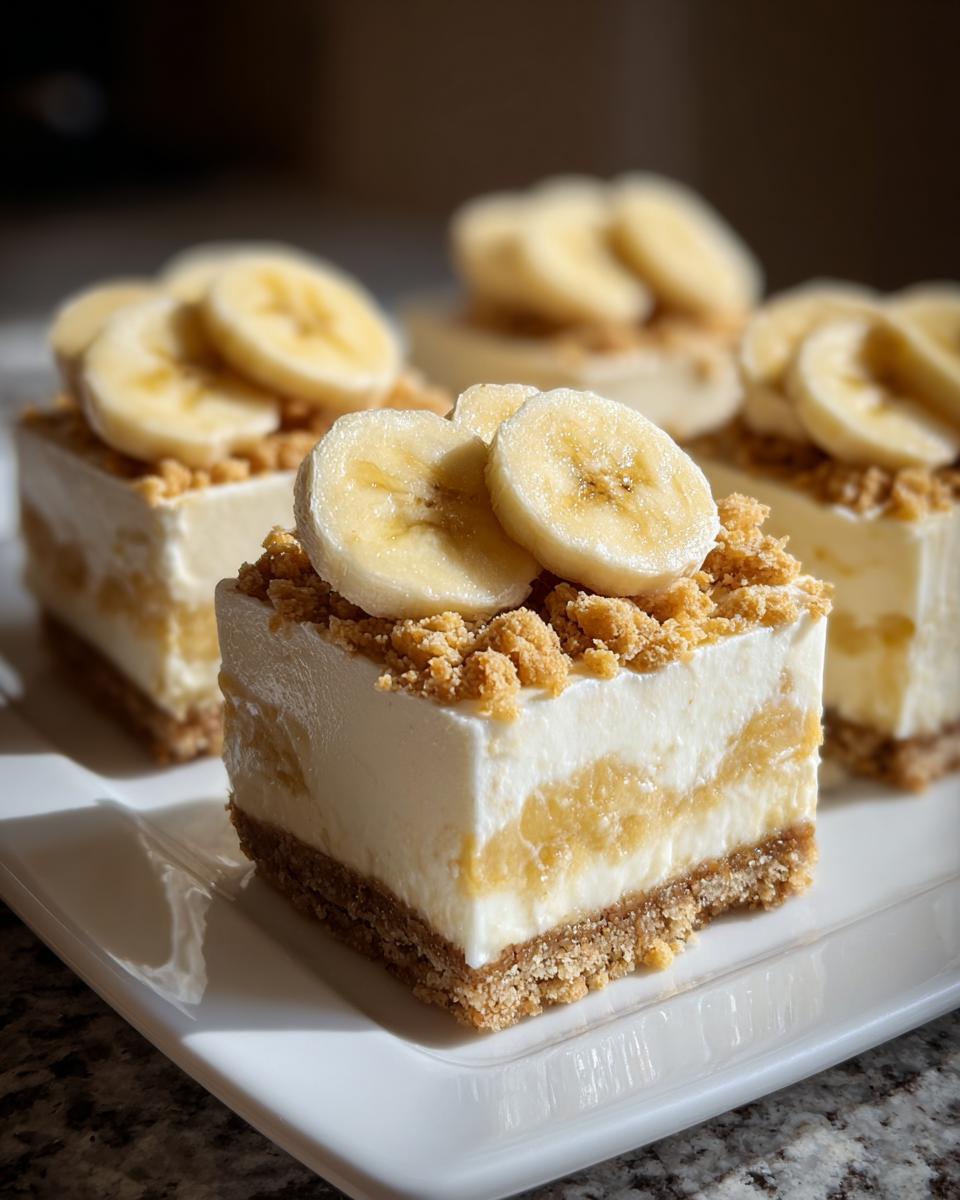
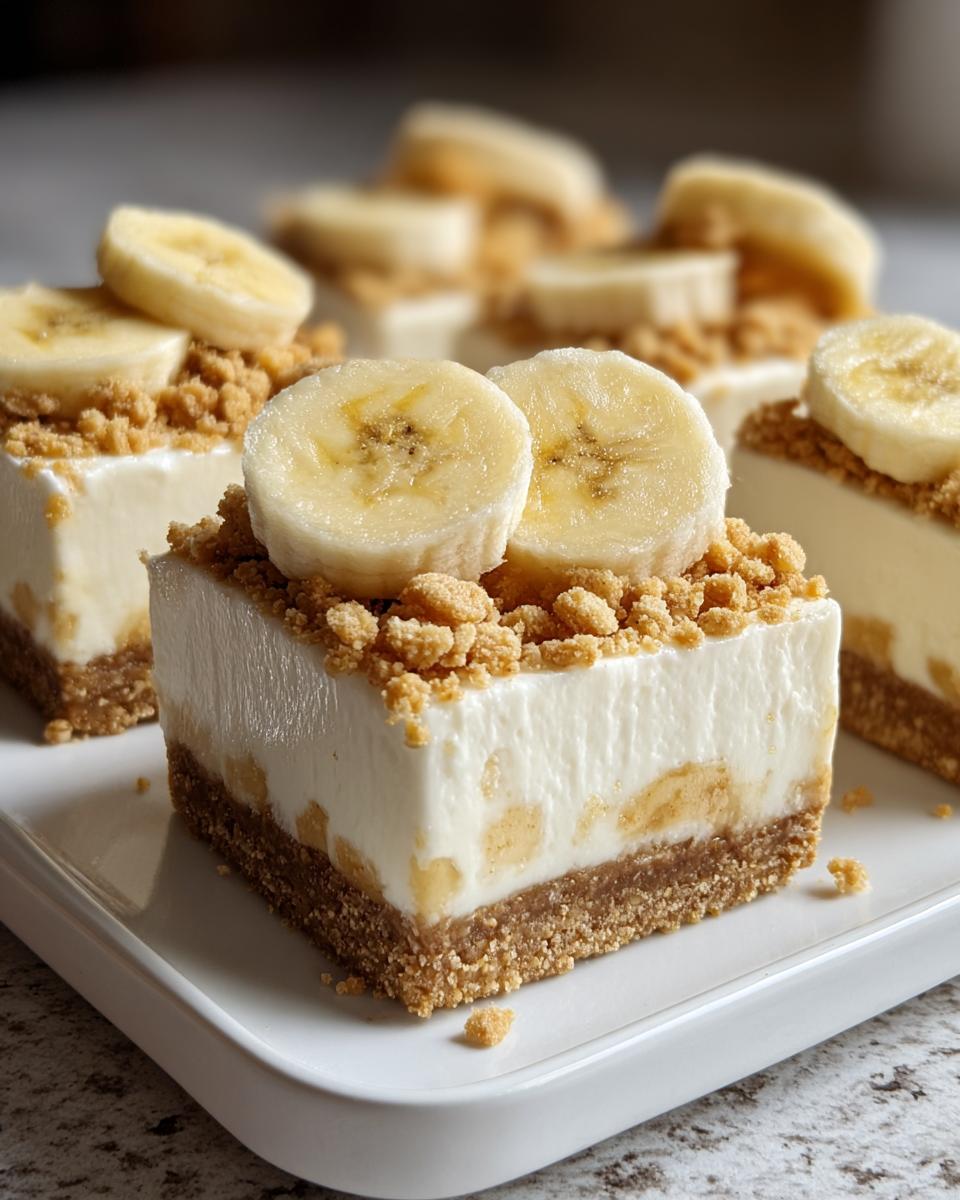
Pull your crust from the fridge and spread the filling evenly over the top. I like to use an offset spatula for this, but a butter knife works too – just get it nice and smooth. Now comes the hardest part – waiting! Cover and refrigerate for at least 4 hours (overnight is even better). This chilling time is CRUCIAL – it lets the flavors meld and gives you those clean, perfect squares when you cut them. Right before serving, top with banana slices and a sprinkle of extra crushed wafers or granola for crunch. Use the parchment paper “handles” to lift the whole thing out before slicing – voila! Professional-looking bars with zero stress.
See? I told you it was easy! Now try not to eat the whole pan in one sitting (no promises though).
Tips for Perfect Banana Cheesecake Bars
After making these bars more times than I can count (purely for “research purposes,” of course), I’ve picked up some foolproof tricks to guarantee perfect results every single time:
- Bananas wait until the end – Slice and add them right before serving to avoid that sad brown color (lemon juice? Never works for me!)
- Full-fat or bust – I know it’s tempting, but don’t use low-fat cream cheese – the texture just isn’t the same
- Chill like you mean it – Four hours minimum, but overnight is golden – the filling sets up beautifully
- Room temp is key – Softened cream cheese blends smoother than cold – patience pays off here
- Crush with care – Your crust crumbs should be fine but not powder – about the texture of coarse sand
Follow these simple tricks, and you’ll be the banana cheesecake bar hero at every gathering!
Variations for Banana Cheesecake Bars
Oh, the fun you can have with these bars! Once you’ve mastered the basic recipe (which is perfection, if I do say so myself), try these tasty twists that keep things exciting:
- Chocolate lover’s dream – Swap the graham crackers for chocolate cookie crumbs in the crust (Oreos work magic here!)
- Nutty surprise – Mix chopped pecans or walnuts right into the crust for extra crunch in every bite
- Caramel drizzle delight – Right before serving, zigzag warm caramel sauce over the top – it pairs amazingly with the banana
- Tropical twist – Add a handful of toasted coconut to the filling or sprinkle it on top
- Peanut butter bliss – Swirl some melted peanut butter into the filling for a banana-PB combo that’ll knock your socks off
The best part? These no-bake banana desserts are like a blank canvas – have fun making them your own!
Serving and Storing Banana Cheesecake Bars
Okay, let me tell you how to serve these beauties for maximum enjoyment! These banana cheesecake bars taste best straight from the fridge – that slight chill makes the creamy filling even more refreshing. When it’s time to slice, I run my knife under hot water and wipe it clean between cuts – you’ll get those picture-perfect squares every time. For parties, I arrange them on a cute platter with extra banana slices scattered around (makes me look fancy with zero effort).
Now, storing them is just as easy as making them! Keep any leftovers (ha!) in an airtight container in the fridge. They’ll stay fresh and dreamy for about 3 days – if they last that long! Pro tip: If you’re making them ahead, wait to add the banana topping until right before serving. And don’t even think about freezing them – the texture turns weird and the bananas get sad. Trust me, I learned that one the hard way!
Banana Cheesecake Bars FAQs
I’ve gotten so many questions about these bars over the years – here are all the answers you need to become a banana cheesecake bar expert!
Can I freeze banana cheesecake bars?
Oh honey, don’t do it! I tried once out of curiosity and the texture went all weird – the filling gets grainy and the bananas turn into sad, brown mush. These are best enjoyed fresh from the fridge within 3 days.
How do I prevent a soggy crust?
Two secrets: 1) Press that crust down REAL firm (I mean business!), and 2) Chill it alone for 10 minutes before adding the filling. This creates a moisture barrier that keeps things crisp.
What can I use instead of banana pudding mix?
In a pinch, vanilla pudding mix with 1 mashed banana works okay, but you’ll miss that intense banana flavor. Some folks use cheesecake pudding mix too – not quite the same, but still tasty!
Why is my filling runny?
Probably didn’t chill long enough! These need at least 4 hours to set properly. Also, make sure your whipped topping was thawed but still cold when you mixed it in.
Can I make these gluten-free?
Absolutely! Just use gluten-free graham crackers or cookies for the crust. The filling is naturally gluten-free as-is – easy peasy!
Nutritional Information for Banana Cheesecake Bars
Let’s keep it real – we all know these are a treat, not health food! But for those who like to keep track, here’s what you’re looking at per delicious square (based on cutting into 9 servings):
Calories: 310
Fat: 18g
Carbs: 32g
Protein: 4g
Remember, these are estimates – your actual numbers might vary slightly depending on exact ingredients and toppings. Everything in moderation, friends!
PrintNo-Bake Banana Cheesecake Bars: 4-Hour Chilling Perfection
No-bake banana cheesecake bars with a graham cracker crust and creamy banana pudding filling, perfect for a quick and delicious dessert.
- Prep Time: 20 minutes
- Cook Time: 0 minutes
- Total Time: 4 hours 20 minutes
- Yield: 9 squares 1x
- Category: Dessert
- Method: No-Bake
- Cuisine: American
- Diet: Vegetarian
Ingredients
- 2 cups crushed vanilla wafers or graham crackers
- ½ cup melted butter
- 2 tbsp brown sugar
- 16 oz cream cheese, softened
- 1 cup powdered sugar
- 1 tsp vanilla extract
- 1 (3.4 oz) box instant banana pudding mix
- 1½ cups cold milk
- 1 cup whipped topping (like Cool Whip)
- 2 bananas, sliced
- Crushed vanilla wafers or granola (for crunch)
Instructions
- Combine crushed vanilla wafers, melted butter, and brown sugar. Press firmly into a parchment-lined 8×8 dish.
- Beat cream cheese until fluffy, then mix in powdered sugar and vanilla.
- In another bowl, whisk pudding mix and milk until thickened. Fold into the cream cheese mix along with whipped topping.
- Pour the banana cheesecake mixture over the crust, smoothing it out evenly. Chill for at least 4 hours or until fully set.
- Add banana slices and a sprinkle of crushed granola or wafers before serving. Cut into squares and enjoy.
Notes
- Chill for at least 4 hours for clean-cut squares.
- Top with bananas just before serving to prevent browning.
- Store leftovers in the refrigerator.
Nutrition
- Serving Size: 1 square
- Calories: 310
- Sugar: 20g
- Sodium: 250mg
- Fat: 18g
- Saturated Fat: 10g
- Unsaturated Fat: 6g
- Trans Fat: 0g
- Carbohydrates: 32g
- Fiber: 1g
- Protein: 4g
- Cholesterol: 45mg
Keywords: Banana Cheesecake Bars, No bake banana dessert, Banana pudding cheesecake, Easy cheesecake squares, Creamy banana treat, Graham cracker crust dessert, Summer dessert bars