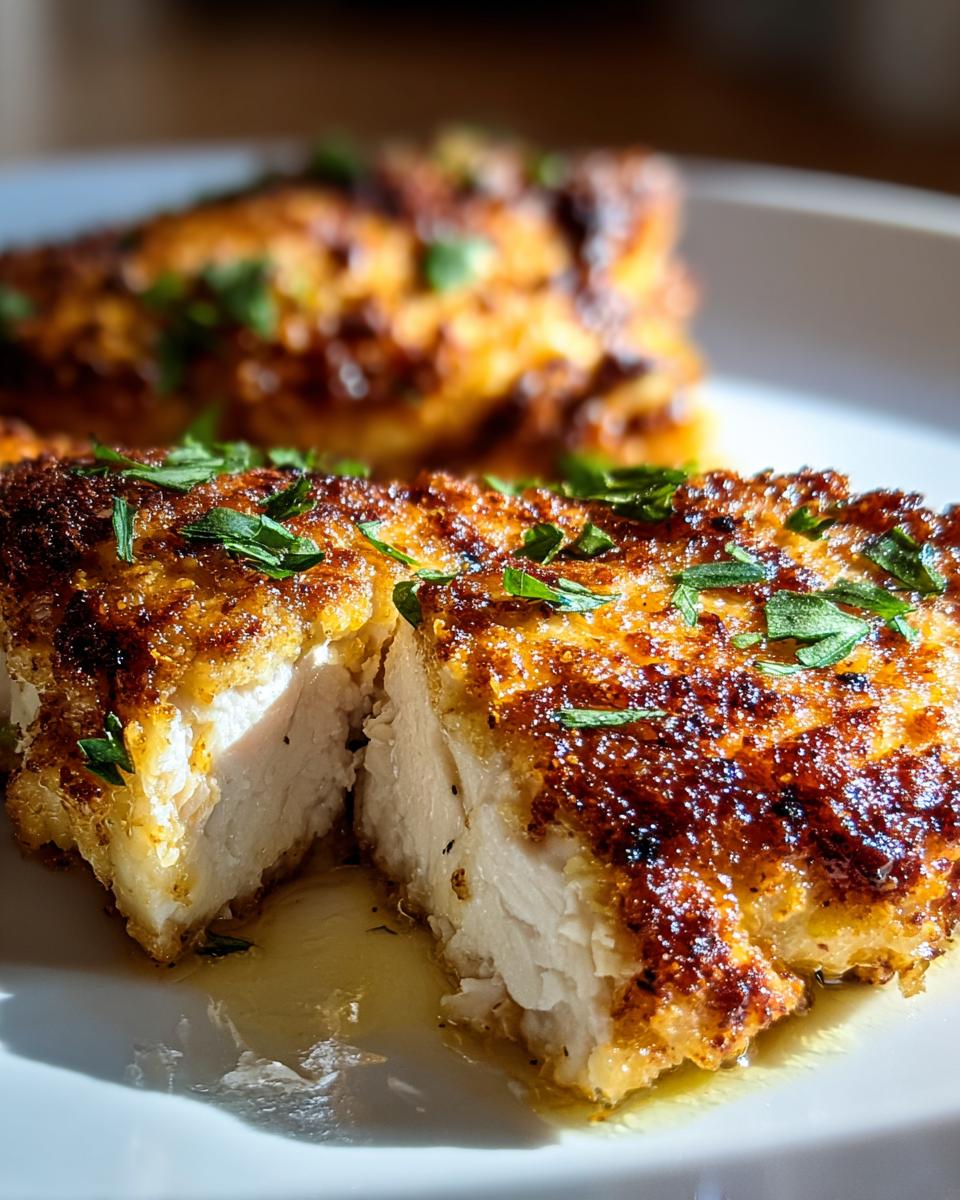
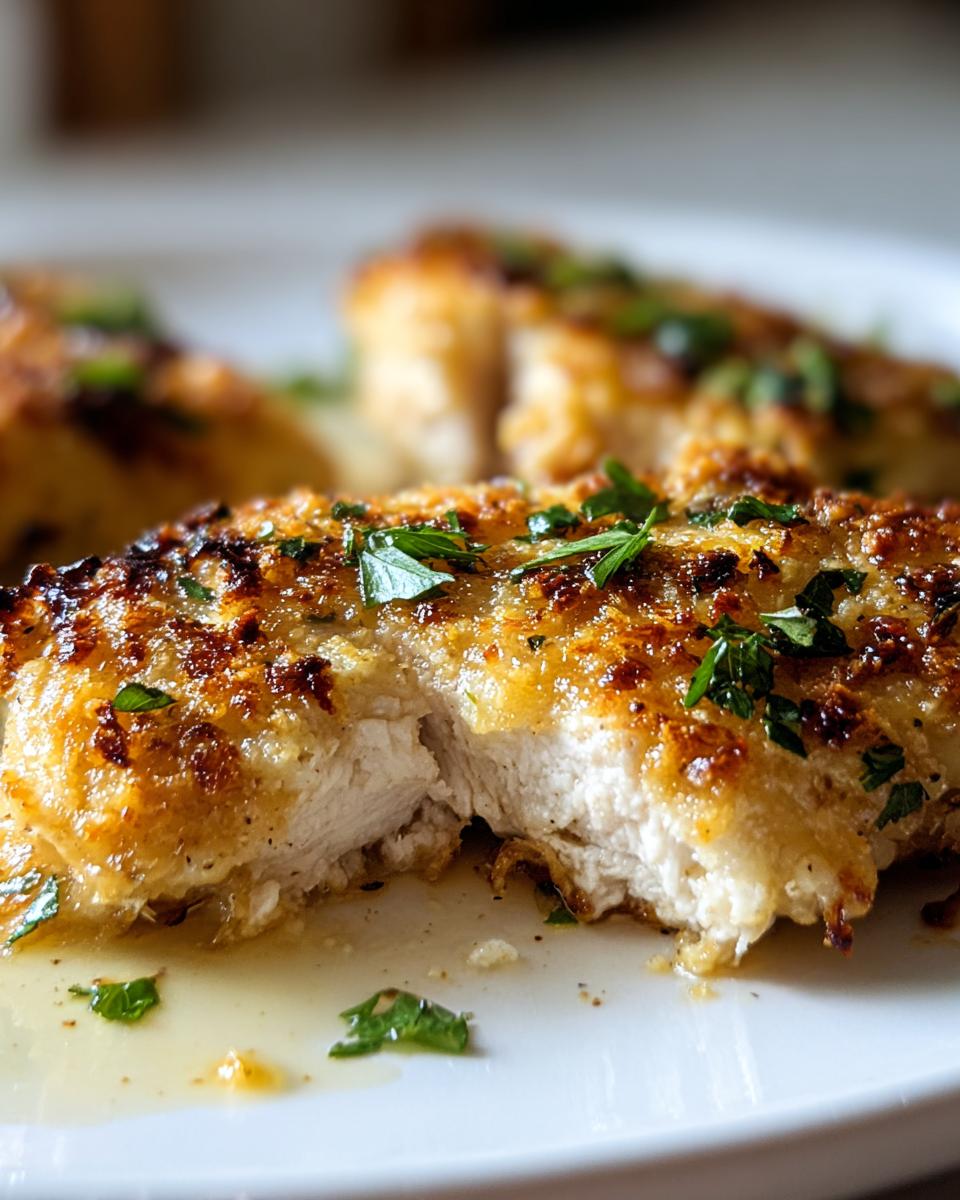
You know those nights when you’re racing against the clock, stomachs are growling, and takeout menus start looking tempting? That’s exactly when my melt-in-your-mouth chicken swoops in to save dinner! This magical recipe gives you crispy, golden-brown chicken with a juicy, tender center—all in under 30 minutes. I discovered it during one particularly chaotic soccer-practice-and-homework night when my kids were seconds away from mutiny. The moment that first bite of this Parmesan-crusted chicken hit their plates? Silence. Just happy chewing sounds. Now it’s our go-to high-protein weeknight hero—simple enough for rushed evenings but delicious enough for company.
Why You’ll Love This Melt-In-Your-Mouth Chicken
Oh, where do I even start? This chicken is basically a weeknight miracle wrapped in crispy Parmesan goodness. Here’s why it’s about to become your new obsession:
- Crazy quick: From fridge to table in 25 minutes flat—even my teenager can’t burn this one!
- Pantry staples only: No fancy ingredients here. That mayo hiding in your fridge? It’s about to become magic.
- Juicy every time: The mayo-Parmesan crust locks in moisture so perfectly, you’ll swear it’s sous vide.
- Kid-approved crispy: My picky eater calls it “chicken candy” and licks the plate. Need I say more?
Trust me, once you taste that golden crust giving way to tender chicken, you’ll be hooked.
Ingredients for Melt-In-Your-Mouth Chicken
Gather up these simple ingredients—I bet you have most of them already! The magic happens when these humble players come together:
- 4 boneless, skinless chicken breasts (about 1½ lbs total, pounded to ½-inch thickness—trust me, this step matters!)
- ½ cup mayonnaise (the real deal, or Greek yogurt if you’re feeling light—I’ve used both and they work beautifully)
- ¼ cup grated Parmesan cheese (packed tightly—none of that shaky green can stuff if you can help it)
- 1 teaspoon garlic powder (our flavor MVP—don’t skimp!)
- ½ teaspoon onion powder (the sneaky depth-builder)
- ½ teaspoon paprika (smoked or sweet, your call—I use whatever’s closest when I’m rushing)
- Salt & black pepper (to taste—I do about ½ tsp salt and ¼ tsp pepper)
- 2 tablespoons chopped fresh parsley (or 2 tsp dried—fresh makes it pretty, but dried works in a pinch)
See? Nothing fancy—just good, honest ingredients that transform chicken into something extraordinary. Now let’s make some magic!
Equipment You’ll Need
No fancy gadgets required here—just a few trusty kitchen staples to make this melt-in-your-mouth chicken happen:
- 9×13-inch baking dish (or whatever size fits your chicken snugly—no swimming allowed!)
- Mixing bowl (medium-sized—big enough to stir without mayo flying everywhere)
- Measuring spoons (because eyeballing garlic powder never ends well)
- Meat mallet or rolling pin (or improvise with a heavy skillet—we’ve all been there)
- Silicone spatula or spoon (for spreading that glorious mayo-Parmesan mix)
That’s it! If you’ve got these basics, you’re minutes away from crispy, juicy chicken heaven. Now let’s get cooking!
How to Make Melt-In-Your-Mouth Chicken
Alright, let’s get down to business! This recipe moves fast once you start, so I always tell my friends: “Preheat first, panic later.” Here’s exactly how I make this chicken turn out perfectly juicy every single time.
Step 1: Prep the Chicken
First things first—turn that oven to 375°F (190°C) and let it heat up while you work. Now grab those chicken breasts and let’s get them ready for their crispy makeover. Place them between two sheets of plastic wrap (or in a zip-top bag if you’re messy like me) and pound them to an even ½-inch thickness. Don’t skip this! Uneven chicken means some parts will dry out while others stay raw—and nobody wants that. I use my grandma’s old rolling pin because the meat mallet disappeared during last year’s kitchen reorganization (oops!).
Step 2: Mix the Coating
Now for the magic potion! In your mixing bowl, combine the mayo, Parmesan, garlic powder, onion powder, paprika, salt, and pepper. Stir it like you mean it—you want every speck of spice distributed evenly. The mixture should look like a creamy, speckled paste that holds its shape when you lift the spoon. Pro tip: Taste a tiny bit on your finger (I won’t tell!) and adjust the seasoning if needed. More garlic? Go for it! This is your chicken canvas—paint it flavorful.
Step 3: Bake to Perfection
Lightly grease your baking dish—I use a quick swipe of olive oil or butter. Arrange your pounded chicken breasts in the dish with a little space between them. Now slather on that mayo mixture like you’re frosting a cake—get it right to the edges! Pop it in the oven and set your timer for 20 minutes. At this point, start peeking through the oven window—you’re looking for golden-brown spots and the edges bubbling slightly. If your chicken breasts are on the thicker side, they might need the full 25 minutes. The safest bet? Check that the internal temp hits 165°F (74°C) with a meat thermometer. Whatever you do, don’t overbake—that’s the only way to mess this up!
When it comes out, sprinkle that fresh parsley over top (it makes it look fancy, and we all eat with our eyes first). Let it rest for 5 minutes—I know it’s hard to wait, but this keeps all those juices locked in. Then? Dig in and prepare for compliments!
Tips for the Best Melt-In-Your-Mouth Chicken
After making this recipe more times than I can count (my family won’t let me stop!), I’ve picked up some foolproof tricks to guarantee perfect results every single time. These little touches make all the difference between good chicken and “oh-my-goodness-what-is-this-sorcery” chicken:
- Pat that chicken dry! I learned this the hard way after a soggy-coating disaster. Use paper towels to blot every last drop of moisture—it helps the mayo mixture cling like edible armor.
- Freshly grated Parmesan is worth it. The pre-shredded stuff has anti-caking agents that can make your crust slightly grainy. When I splurge on a wedge of real Parmigiano-Reggiano? The texture turns velvety-crisp.
- Rest like a pro. I know it’s torture to wait when your kitchen smells amazing, but letting the chicken sit for 5 minutes after baking redistributes those juices. Cut into it too soon, and all that precious moisture escapes!
- Watch your oven’s hot spots. My ancient oven burns everything on the left side, so I rotate the pan halfway through. If your crust is browning too fast, just tent some foil over the top—no shame in that game!
These simple tweaks take this recipe from “pretty good” to “where has this been all my life?” territory. Now go forth and bake with confidence!
Variations for Melt-In-Your-Mouth Chicken
One of my favorite things about this recipe? It’s like a blank canvas for flavor experiments! Over the years, I’ve played around with all sorts of twists—here are the best ones that passed the family taste-test:
- Herb explosion: Stir 1 tsp Italian seasoning into the mayo mix (or go wild with dried thyme + rosemary). My neighbor adds a pinch of lemon zest too—so fresh!
- Smoky swap: Replace regular paprika with smoked paprika. This little change gives the chicken this incredible campfire-kissed flavor that makes my husband do happy dances.
- Cheese please: Mix in ¼ cup shredded mozzarella with the Parmesan for extra gooeyness. (Pro tip: Add a sprinkle on top during the last 5 minutes for browned cheese bliss!)
- Spice it up: A dash of cayenne or red pepper flakes wakes everything up. My teen calls this version “chicken with attitude” and requests it weekly.
- Breadcrumb bonus: For extra crunch, press panko breadcrumbs onto the mayo-coated chicken before baking. It’s like giving your chicken a crispy winter jacket!
The best part? You can mix and match these ideas based on what’s in your pantry. I’ve yet to find a combo that doesn’t work—this recipe just wants to make you happy!
Serving Suggestions
Now that you’ve got this gorgeous golden chicken, let’s talk about what to serve with it! I’ve tested every combo under the sun, and these are the pairings that make my family cheer loudest:
- Roasted lemon-garlic asparagus: Toss spears with olive oil, minced garlic, and lemon slices—roast at 400°F (200°C) while the chicken bakes. The bright acidity cuts through the richness perfectly.
- Creamy garlic mashed potatoes: My kids insist on this comfort classic. Pro tip: Use some of the starchy potato water to make them extra fluffy!
- Simple arugula salad: Just toss peppery greens with lemon juice, olive oil, and shaved Parmesan. It’s the ideal crisp contrast to that tender chicken.
- Steamed green beans with almond slivers: Quick-steam the beans until crisp-tender, then finish with toasted almonds and a sprinkle of lemon zest. Takes 5 minutes and looks fancy!
- Buttery orzo: Cook the orzo in chicken broth, then stir in a knob of butter and fresh herbs. Soaks up all those delicious chicken juices beautifully.
For busy nights, I’ll often roast a big tray of baby potatoes and broccoli alongside the chicken—one-pan magic! And if you’re feeling extra? A chilled glass of Chardonnay turns this into company-worthy fare. Whatever you choose, that crispy, juicy chicken will be the star of the show.
Storage & Reheating
Let’s be real—this chicken is so good, leftovers rarely happen in my house! But on the off chance you’ve got some extra (maybe you doubled the batch like I sometimes do), here’s how to keep it tasting just as amazing as day one:
- Fridge storage: Pop any cooled leftovers in an airtight container—I like to separate pieces with parchment paper so they don’t stick. They’ll stay juicy and delicious for up to 3 days. (Though between us? It never lasts that long!)
- Reheating magic: To bring back that glorious crispiness, skip the microwave (unless you love soggy chicken—no judgment!). Instead, reheat in a 350°F (175°C) oven for about 10 minutes. I sometimes give it a quick broil at the end to wake up the crust.
- Freezer hack: Yes, you can freeze it! Wrap individual pieces tightly in foil, then place in a freezer bag for up to 2 months. Thaw overnight in the fridge before reheating—it won’t be quite as perfect, but still beats most frozen meals!
My favorite next-day trick? Chop leftover chicken cold over a salad—that crispy Parmesan coating becomes the world’s best crouton substitute. Breakfast, lunch, or midnight snack, this chicken keeps on giving!
Nutritional Information
Okay, let’s talk numbers—because I know some of you (like me!) like to keep an eye on what’s going into your body. Here’s the nutritional lowdown for one serving of this glorious melt-in-your-mouth chicken. Just remember: These are estimates based on my exact ingredient list, so your mileage may vary depending on brands and portion sizes!
- Calories: 370 (but who’s counting when it’s this delicious?)
- Fat: 22g (most of it from that good mayo—worth every bite!)
- Saturated Fat: 4g
- Protein: 35g (hello, muscle fuel!)
- Carbs: 2g (basically negligible—perfect for low-carb folks)
- Sugar: 1g
- Sodium: 450mg
Using Greek yogurt instead of mayo? You’ll shave off about 50 calories and 5g of fat per serving—but honestly, I think the original version is worth the splurge! The protein content stays about the same, making this a fantastic post-workout meal either way. Now go enjoy every guilt-free bite!
Frequently Asked Questions
I’ve gotten so many great questions about this recipe over the years—here are the ones that pop up most often, along with my honest answers from countless kitchen experiments!
- Can I use chicken thighs instead of breasts? Absolutely! Thighs actually stay juicier since they’ve got more fat. Just bump the baking time to 25-30 minutes—they’re done when they hit 175°F (80°C) internally. I sometimes cut slits in the thicker parts to help them cook evenly.
- How far ahead can I prep this? You can coat the chicken up to 4 hours before baking—just keep it covered in the fridge. Any longer and the salt starts breaking down the meat too much (learned that the hard way!). The mayo mixture actually helps protect the chicken from drying out during this short wait.
- Is Greek yogurt really a good substitute for mayo? It works in a pinch! The yogurt makes a tangier, lighter coating that’s still delicious, though you lose some of that golden crispiness. My trick? Mix 1 tbsp olive oil into ½ cup Greek yogurt to help it brown better.
- Why does my coating sometimes slide off? Two likely culprits: Either the chicken wasn’t patted dry enough (moisture is the enemy of adhesion!), or you moved the pieces too soon after baking. Letting them rest 5 minutes lets the crust set properly.
- Can I make this with frozen chicken? I don’t recommend it—thaw completely first. Frozen chicken releases too much water, making the coating gummy. If you’re in a bind, thaw in cold water (in its sealed package) for about 30 minutes.
- What if I don’t have a meat mallet? No worries! A rolling pin, heavy skillet, or even a wine bottle works. Or just butterfly thicker breasts—slice horizontally almost through, then open like a book. Same effect, less pounding!
Still have questions? Drop them in the comments—I test every variation imaginable and love swapping kitchen hacks! Now go make some chicken magic happen.
Try This Recipe Tonight and Tag Us With Your Results!
Alright, my fellow chicken enthusiasts—it’s go time! This melt-in-your-mouth magic is just waiting to happen in your kitchen. I want to see your golden-brown masterpieces and hear how your family reacts (I’m betting on lots of “mmm” sounds and empty plates). Snap a pic of that crispy crust, share your favorite variations, and tag me so I can cheer you on! Whether it’s your first time or your fiftieth, this recipe never fails to bring joy to the table. Now grab that mayo and Parmesan—your tastebuds are about to throw a party!
For more delicious recipes, check out our recipes section or explore our snacks category for quick bites. And don’t forget to share your creations on Pinterest!
PrintIrresistible 25-Minute Melt-In-Your-Mouth Chicken Recipe

Crispy outside, juicy inside—the ultimate quick dinner fix!
- Prep Time: 5 minutes
- Cook Time: 20 minutes
- Total Time: 25 minutes
- Yield: 4 servings 1x
- Category: Dinner
- Method: Baked
- Cuisine: American
- Diet: Low Lactose
Ingredients
- 4 boneless skinless chicken breasts
- ½ cup mayonnaise (or Greek yogurt)
- ¼ cup grated Parmesan cheese
- 1 teaspoon garlic powder
- ½ teaspoon onion powder
- ½ teaspoon paprika
- Salt & black pepper, to taste
- 2 tablespoons chopped fresh parsley (or dried)
Instructions
- Preheat oven to 375°F (190°C). Pound chicken breasts to even thickness.
- In a bowl, mix mayo, Parmesan, garlic powder, onion powder, paprika, salt, and pepper.
- Spread the mixture evenly over each chicken breast. Place in a greased baking dish.
- Bake uncovered for 20–25 minutes until the chicken is cooked through and lightly browned.
- Sprinkle with fresh parsley before serving.
Notes
- Pounding the chicken ensures even cooking.
- Greek yogurt can substitute mayo for a lighter option.
- Serve with veggies, mashed potatoes, or salad.
Nutrition
- Serving Size: 1 chicken breast
- Calories: 370
- Sugar: 1g
- Sodium: 450mg
- Fat: 22g
- Saturated Fat: 4g
- Unsaturated Fat: 16g
- Trans Fat: 0g
- Carbohydrates: 2g
- Fiber: 0g
- Protein: 35g
- Cholesterol: 95mg
Keywords: Easy baked chicken breast, Juicy mayo Parmesan chicken, Quick oven chicken recipe, Crispy tender chicken dinner, Weeknight chicken breast idea, High protein chicken meal