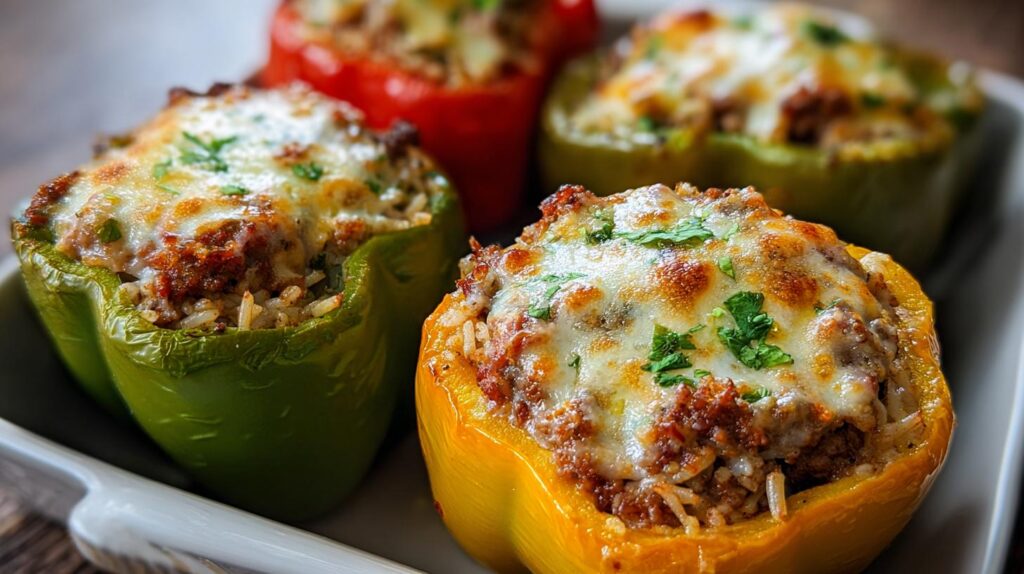
Oh, cheesy stuffed peppers – my ultimate weeknight hero! There’s something magical about how humble bell peppers transform into these gorgeous little edible bowls, packed with seasoned beef, fluffy rice, and that glorious blanket of melted cheese. This recipe became a family favorite after I desperately needed a “one-pan wonder” during my busiest mom era. Now? My kids beg for them, and even my picky uncle clears his plate. The best part? You probably have most ingredients already. Just wait until you see how the peppers soften into sweet, tender perfection while the cheese gets all golden and bubbly. Comfort food doesn’t get easier—or cheesier—than this!
Why You’ll Love These Cheesy Stuffed Peppers
Trust me, these aren’t just any baked stuffed peppers—they’re the kind of easy dinner recipe that makes you feel like a kitchen rockstar with minimal effort. Here’s why they’re a forever favorite in my house:
- One-pan magic: From skillet to baking dish, cleanup is a breeze (hello, weeknight win!).
- Cheese pull for days: That melty mozzarella-cheddar combo? Pure comfort food happiness.
- Customizable: Swap ingredients based on what’s in your fridge—it’s forgiving like that.
- Leftover hero: Tastes even better the next day (if they last that long).
Ingredients for Cheesy Stuffed Peppers
Grab these simple ingredients – I promise, nothing fancy here! The magic happens when they all come together. (Pro tip: Measure everything before you start cooking. It makes the process so much smoother.)
- 5 medium bell peppers (any color – I love mixing red and yellow for a pop of color), halved lengthwise and seeds removed
- 1 lb lean ground beef (85/15) – the slight fat keeps ’em juicy without being greasy
- 1 small onion, finely chopped (about ½ cup – trust me, you want those bits small so they melt into the filling)
- 2 cloves garlic, minced (or 1 teaspoon pre-minced if you’re in a hurry)
- 1 cup cooked white rice (leftover rice works perfectly here!)
- ½ cup tomato sauce (the plain kind in a can is ideal – no need for fancy marinara)
- 1 cup shredded mozzarella, packed (freshly grated melts better than pre-shredded)
- ½ cup shredded cheddar (sharp cheddar adds a nice bite)
- 1 teaspoon Italian seasoning (or ½ tsp dried basil + ½ tsp dried oregano if you don’t have the blend)
- ½ teaspoon each salt & black pepper (I always taste and adjust after mixing)
- Fresh parsley, chopped (for garnish – optional but pretty!)
See? Nothing weird or hard-to-find. Now let’s make some cheesy magic happen!
Equipment Needed
Don’t worry – you won’t need any fancy gadgets for these cheesy stuffed peppers! Just grab these basics from your kitchen:
- Large baking dish (9×13 inch works perfectly)
- Skillet (for browning that delicious beef)
- Mixing bowl (medium-sized does the trick)
- Aluminum foil (for that crucial covered baking step)
That’s it! Now let’s get cooking – the cheesy goodness awaits.
How to Make Cheesy Stuffed Peppers
Okay, let’s get to the fun part! Making these cheesy stuffed peppers is seriously easy – I’ll walk you through each step so yours turn out perfect. The best part? Most of the work happens while the oven preheats. Now roll up those sleeves (or don’t – this isn’t messy at all!) and let’s do this.
Prep the Peppers
First things first: those beautiful bell peppers! Grab your peppers and rinse them under cool water – no need to dry them, a little water won’t hurt. Place each one on its side and slice straight through the stem end to make two boat-like halves. Scoop out the seeds and white membranes (a spoon works great for this).
Pro tip: If your peppers won’t sit flat, just slice a tiny bit off the bottom to create a stable base. Don’t cut too much or you’ll lose that precious filling space! Size-wise, medium peppers (about the size of your fist) work best – huge ones take forever to cook through, while tiny ones overflow easily.
Cook the Filling
While your oven heats to 375°F (yep, do this now!), let’s make that irresistible filling. Heat your skillet over medium and add the ground beef, breaking it up with a wooden spoon. When it’s about halfway browned (2-3 minutes), toss in the onions. Keep stirring until the beef is fully cooked and the onions turn translucent – about 5 minutes total.
Drain any excess grease (I just tip the skillet and use a spoon to remove it), then stir in the garlic. Ohhh, smell that? Now’s when the magic starts! Add the tomato sauce, Italian seasoning, salt, and pepper. Let it simmer for 2 minutes so the flavors marry. Take it off the heat and mix in the rice – it’ll soak up all those delicious juices.
Stuff and Bake
Time for the fun part – stuffing! Arrange your pepper halves in the baking dish (they can cozy up close together). Spoon the filling generously into each one, mounding it slightly. Don’t pack it down too hard – you want it fluffy! Now the cheesy crown: Sprinkle mozzarella first, then cheddar over every pepper half. Be generous – this is the “cheesy” in cheesy stuffed peppers, after all!
Cover the dish tightly with foil (this keeps them moist while the peppers soften) and bake for 25 minutes. Then, the grand finale: remove the foil and bake another 10-15 minutes until the cheese is gloriously golden and bubbly. Your kitchen will smell amazing – try not to eat one straight from the dish (I never succeed at this). Let them rest 5 minutes before serving – trust me, they’re lava-hot inside!
Tips for Perfect Cheesy Stuffed Peppers
After making these cheesy stuffed peppers more times than I can count (seriously, my family won’t let me stop), I’ve picked up some game-changing tricks. These little tweaks take them from good to “oh-my-goodness-can-I-have-seconds” amazing:
Freshly grate your cheese: I know, I know—pre-shredded is convenient. But trust me, the anti-caking agents in bagged cheese make it melt weirdly. A block of mozzarella and cheddar grated right before using? That’s when you get those Instagram-worthy cheese pulls.
Let them rest before serving: I know it’s hard when your kitchen smells like cheesy heaven, but wait 5 minutes after baking. This lets the filling set so it doesn’t spill everywhere when you take that first bite (and saves your tongue from molten cheese burns—been there!).
Par-cook extra-crisp peppers: If your peppers are super firm, microwave the halves for 2 minutes before stuffing. This softens them just enough so they bake evenly without staying crunchy while the filling overcooks.
Use leftover rice: Day-old rice works BETTER than fresh here! It absorbs the beef juices without getting mushy. No leftovers? Spread freshly cooked rice on a tray to cool quickly—it makes all the difference in texture.
Oh! One last thing—if your cheese starts browning too fast, just lay a loose piece of foil over the top. No one likes burnt cheese (okay, maybe my weird uncle does, but we don’t talk about that).
Variations for Cheesy Stuffed Peppers
One of my favorite things about this recipe? How easily it adapts to whatever’s in your fridge or dietary needs! Here are my go-to twists when I’m mixing things up:
- Lighter option: Swap ground beef for turkey or chicken (just add a splash of olive oil to keep it moist).
- Grain swap: Use quinoa or cauliflower rice instead of white rice—same fluffy texture!
- Vegan magic: Plant-based ground “meat” and vegan cheese work surprisingly well here.
- Spice lover’s dream: Add diced jalapeños or a pinch of red pepper flakes to the filling.
See? Endless possibilities while keeping that cozy, cheesy vibe.
Serving Suggestions
Oh, let me tell you – these cheesy stuffed peppers are practically a meal on their own, but a couple simple sides turn them into a full feast! Here’s what we love pairing with them:
Garlic bread: Because what’s better than cheesy peppers? Cheesy peppers with crispy, buttery bread for soaking up every last bit of filling! I just grab a baguette, slice it, spread with garlic butter, and toast while the peppers bake.
Simple green salad: A light, tangy salad cuts through the richness perfectly. My go-to? Mixed greens with cherry tomatoes, cucumber slices, and a quick lemon vinaigrette. The fresh crunch balances those tender peppers so well.
That’s it – no need to overcomplicate! Sometimes we just do the peppers with extra napkins (for all that cheesy goodness), and everyone’s perfectly happy.
Storing and Reheating
Here’s the good news – these cheesy stuffed peppers might taste even better as leftovers! (I may or may not hide a couple in the back of the fridge just for me.) But let’s talk proper storage so they stay delicious:
Fridge storage: Let them cool completely (about 30 minutes), then tuck them into an airtight container. They’ll keep beautifully for 3 days – though in my house, they rarely last that long. Layer them between parchment paper if stacking to prevent sticking.
Reheating magic: For that just-baked feel, oven reheating is king. Pop them on a baking sheet at 350°F for 15-20 minutes until heated through. No oven time? Microwave single portions for 1-2 minutes, stopping to stir the filling halfway. Pro tip: Add a tiny splash of water before microwaving to keep the peppers from drying out!
Freezer option: Yes, you can freeze them! Wrap each pepper half individually in foil, then store in a freezer bag for up to 2 months. Thaw overnight in the fridge before reheating. The texture changes slightly, but that cheesy comfort? Still 100% there.
Nutritional Information
Now, I’m no nutritionist, but here’s the scoop on what’s in these cheesy stuffed peppers! (And hey – comfort food is soul food, right?) Remember, these numbers can change based on your exact ingredients – especially the cheese and beef you choose. My calculations are for one hearty pepper half – you know, the kind that actually fills you up!
- Calories: 420
- Protein: 28g (That beef and cheese combo packs a punch!)
- Carbs: 29g (Mostly from that fluffy rice and sweet peppers)
- Fiber: 3g (Thanks to those trusty bell peppers!)
- Sugar: 6g (Natural sweetness from the peppers)
- Fat: 22g (10g saturated – it’s the cheese and beef working their magic)
A quick heads up: If you’re watching sodium, you might reduce the added salt since cheese already brings plenty. And for my lactose-sensitive friends – yeah, the cheese means this isn’t completely lactose-free, but the cheddar’s naturally lower in lactose than softer cheeses. As always, these are estimates – your mileage may vary based on brands and how generous you are with that cheese topping! (No judgment here – I always add extra.)
Common Questions About Cheesy Stuffed Peppers
I’ve gotten so many questions about these cheesy stuffed peppers over the years – let me answer the ones that pop up most often! (And hey, if you’ve got one I didn’t cover, shout it out in the comments!)
Can I freeze cheesy stuffed peppers?
Absolutely! Let them cool completely, then wrap each pepper half tightly in plastic wrap followed by foil. They’ll keep beautifully in the freezer for up to 2 months. When ready to eat, thaw overnight in the fridge and reheat in a 350°F oven for about 20 minutes. The peppers soften more after freezing, but that cheesy filling stays just as delicious!
Can I use brown rice instead of white?
You bet! Brown rice works great – just note it’ll make the filling a bit chewier. I recommend cooking it al dente (slightly firm) since it’ll soften more during baking. Same goes for wild rice blends – they add wonderful nutty flavor. Pro tip: Increase the liquid slightly when cooking brown rice for this recipe (about 1/4 cup extra water or broth).
Why do my peppers stay crunchy?
Ah, this usually happens if the peppers were super thick-walled to begin with. Next time, try microwaving the halved peppers for 2 minutes before stuffing (like I mention in the tips section). Also, make sure you’re baking them covered with foil for the first 25 minutes – that steam is crucial for tender peppers!
Can I make these ahead for meal prep?
Oh yes, they’re meal prep superstars! Assemble everything (including cheese topping), cover tightly, and refrigerate for up to 24 hours before baking. You might need to add 5-10 extra minutes to the baking time since everything starts cold. They also reheat like a dream – my favorite make-ahead weeknight meal!
What’s the best cheese blend?
While mozzarella and cheddar are my go-to, feel free to experiment! Pepper jack adds a nice kick, provolone melts beautifully, and even a sprinkle of parmesan on top adds depth. The key is using cheeses that melt well – avoid super dry aged cheeses or pre-grated “pizza blends” with anti-caking agents.
Now that you’re armed with all the cheesy stuffed pepper knowledge – go make some magic! Tag me in your photos so I can see your creations (and maybe steal your cheese-blend ideas!).
Print5 Irresistible Cheesy Stuffed Peppers That Wow Every Time

Cheesy stuffed bell peppers with rice make a satisfying and easy dinner. This dish combines ground beef, rice, and melted cheese for a hearty meal.
- Prep Time: 15 minutes
- Cook Time: 40 minutes
- Total Time: 55 minutes
- Yield: 5 servings 1x
- Category: Main Course
- Method: Baking
- Cuisine: American
- Diet: Low Lactose
Ingredients
- 5 bell peppers (green, yellow, or red), halved and seeds removed
- 1 cup cooked white rice
- 1 lb ground beef
- 1 small onion, finely chopped
- 2 cloves garlic, minced
- 1 cup shredded mozzarella cheese
- ½ cup shredded cheddar cheese
- ½ teaspoon salt
- ½ teaspoon black pepper
- 1 teaspoon Italian seasoning
- ½ cup tomato sauce
- Fresh parsley, chopped (for garnish)
Instructions
- Preheat oven to 375°F. Lightly grease a baking dish.
- Arrange bell pepper halves cut-side up in the baking dish.
- In a skillet over medium heat, cook ground beef with onion until browned. Drain excess grease.
- Add garlic, salt, pepper, Italian seasoning, and tomato sauce. Stir and cook for 2–3 minutes.
- Remove from heat and mix in cooked rice.
- Spoon the rice mixture evenly into each bell pepper half.
- Top generously with mozzarella and cheddar cheese.
- Cover with foil and bake for 25 minutes.
- Remove foil and bake an additional 10–15 minutes, until cheese is melted and lightly golden.
- Garnish with fresh parsley and serve warm.
Notes
- Use any color bell pepper for variety.
- For a lighter version, substitute ground turkey for beef.
- Leftovers can be stored in the fridge for up to 3 days.
Nutrition
- Serving Size: 1 stuffed pepper half
- Calories: 420
- Sugar: 6g
- Sodium: 520mg
- Fat: 22g
- Saturated Fat: 10g
- Unsaturated Fat: 9g
- Trans Fat: 1g
- Carbohydrates: 29g
- Fiber: 3g
- Protein: 28g
- Cholesterol: 85mg
Keywords: stuffed peppers with rice, baked stuffed peppers, easy dinner recipe, healthy comfort food, weeknight meals