There’s nothing quite like the smell of a homemade blueberry pie wafting through the kitchen – that perfect blend of sweet fruit and buttery crust that instantly transports me back to summers at my grandma’s farmhouse. She’d send me out with an old tin pail to pick berries still warm from the sun, and by afternoon, we’d be slicing into a pie with crust so flaky it shattered at the touch of a fork.
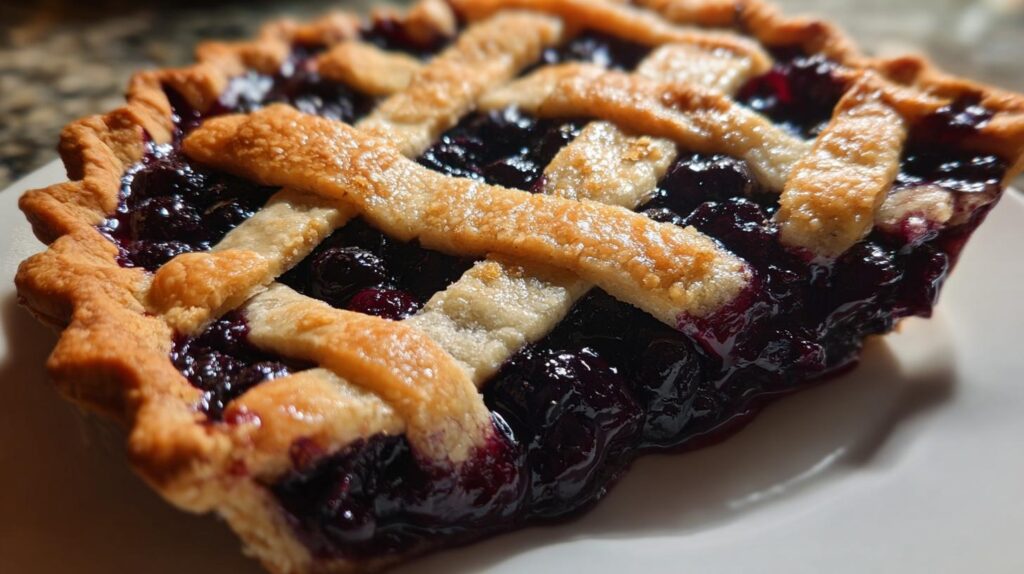
That’s the magic I’m sharing with you today – a classic blueberry pie recipe with a tender, shattering crust that cradles plump berries bursting with juicy flavor. Whether you’re using just-picked summer berries or frozen ones in a pinch (no judgement here!), this pie delivers that nostalgic taste of homemade goodness. The lattice top isn’t just pretty – those golden strips let steam escape so your filling sets up perfectly instead of turning soupy. Trust me, once you master this recipe, you’ll be the hero at every potluck and family gathering.
Why You’ll Love This Blueberry Pie Recipe
First off, that crust. Oh, that crust! It shatters into buttery flakes with just the gentlest press of your fork – the kind of texture that makes you close your eyes and savor every bite. The filling? Sweet but not cloying, with just enough tartness from the berries and a hint of lemon to keep things bright. And don’t let that gorgeous lattice top intimidate you – my method makes weaving those strips practically foolproof. Whether it’s your first pie or your fiftieth, this recipe delivers that perfect balance of nostalgia and deliciousness every single time.
Blueberry Pie Ingredients
Okay, let’s gather our pie-making essentials! I’ve learned through many berry-stained aprons that quality ingredients make all the difference here. You’ll need:
- 2 1/2 cups all-purpose flour – spooned and leveled, please! No packing it down
- 1 tbsp granulated sugar – just enough to sweeten the crust slightly
- 1 tsp fine salt – I use kosher salt for better distribution
- 1 cup (2 sticks) cold unsalted butter – cubed and chilled again while you prep other ingredients
- 6–8 tbsp ice water – literally ice cubes floating in it – cold is crucial!
- 6 cups blueberries – fresh or frozen (no need to thaw if frozen)
- 3/4 cup granulated sugar – adjust up to 1 cup if your berries are super tart
- 1/4 cup cornstarch – this thickens the juices perfectly without clouding
- 1 tbsp lemon juice – brightens up the berry flavor beautifully
- 1 tsp lemon zest (optional) – my secret flavor booster!
- 1/2 tsp ground cinnamon (optional) – adds warmth without overpowering
- 1/4 tsp salt – balances all that sweetness
- 1 tbsp unsalted butter – for dotting on top of the filling
- 1 egg – for that gorgeous golden sheen
- 1 tbsp milk or water – to thin the egg wash
- 1–2 tbsp coarse sugar (optional) – for that irresistible sparkly crunch
A quick tip – measure everything before you start! There’s nothing worse than realizing mid-dough that your butter softened too much while you were hunting for the cornstarch. Trust me, I’ve been there!
Equipment Needed for Your Blueberry Pie
You don’t need fancy gadgets to make an incredible blueberry pie – just these trusty basics from my kitchen: a sturdy rolling pin (I swear by my grandma’s wooden one), a trusty 9-inch pie dish (glass or ceramic works best), and a baking sheet to catch any berry drips. That’s it! Oh, and don’t forget your hands – the best tools for crimping those edges with love.
How to Make the Perfect Blueberry Pie
Alright, let’s get our hands floury! I’ve made this pie more times than I can count, and I’ve learned a few tricks along the way to make sure it turns out perfect every time. Follow these steps, and you’ll be slicing into pie heaven before you know it.
Preparing the Flaky Pie Crust
First things first – that glorious crust! The secret? Keep everything cold, cold, cold. I even chill my mixing bowl for 10 minutes before starting. Whisk together the flour, sugar, and salt, then cut in those butter cubes until you’ve got pea-sized crumbs. Here’s my trick – I use my fingers to pinch some of the butter into flat shards. These melt during baking, creating those irresistible flaky layers.
Now, drizzle in the ice water one tablespoon at a time, mixing with a fork just until the dough starts to clump. You want it to hold together when pinched, but not be wet. Divide the dough into two disks (one slightly larger for the bottom crust), wrap tightly in plastic, and chill for at least an hour. This rest period relaxes the gluten and makes rolling so much easier!
Making the Blueberry Filling
While the dough chills, let’s make that luscious filling. In a big bowl, gently toss the blueberries with sugar, cornstarch, lemon juice, and salt. If you’re using the zest and cinnamon, add them now too. The cornstarch might look like a lot at first, but trust me – it’ll dissolve into the juices as the pie bakes, giving you that perfect sliceable consistency.
Here’s a pro tip: let the mixture sit for 10 minutes after mixing. You’ll see the berries start releasing their juices, which helps the cornstarch start working its magic. Give it one more gentle stir before pouring into the crust.
Assembling and Baking Your Blueberry Pie
Roll out your larger dough disk into a 12-inch circle and fit it into your pie dish, leaving a slight overhang. Pour in the filling and dot with butter – this adds richness and helps thicken the juices. Now for the fun part – the lattice!
Roll out the second disk and cut it into 10-12 strips. Lay half horizontally across the pie, then weave the others vertically. Don’t stress about perfection – rustic charm is part of homemade pie’s appeal! Crimp the edges, brush with egg wash, and sprinkle with coarse sugar for that bakery-worthy sparkle.
Bake at 400°F for 20 minutes to set the crust, then reduce to 350°F for 35-45 minutes until the filling is bubbling and the crust is deep golden. If the edges brown too fast, just tent them with foil. And here’s the hardest part – let it cool completely (at least 3 hours) before slicing. I know it’s tempting, but this patience pays off with clean slices instead of blueberry soup!
Tips for the Best Blueberry Pie Recipe
Here’s the inside scoop from my many pie-making adventures! First – that butter must stay cold. I actually freeze my cubed butter for 15 minutes before mixing. Sounds extra, but it makes the flakiest crust you’ll ever taste. Frozen berries? No problem! Just toss them in frozen – they’ll release just the right amount of juice as they bake. And please, please resist cutting into that beautiful pie too soon. Letting it cool completely (yes, those agonizing 3 hours!) means your slices will hold their shape instead of oozing everywhere. Your patience will be rewarded!
Blueberry Pie Variations and Serving Suggestions
Oh, the possibilities! While I adore this classic blueberry pie just as it is, sometimes I like to mix things up. Try adding a handful of raspberries for a berry medley, or swap half the blueberries with blackberries for deeper flavor. Serving ideas? A scoop of vanilla ice cream melting into the warm pie is heaven, but for something lighter, fresh whipped cream with a hint of lemon zest is divine. My dad always insists on a slice with sharp cheddar cheese – don’t knock it till you try it!
Storing and Reheating Your Homemade Blueberry Pie
Here’s the scoop on keeping your pie perfect! At room temp, it’ll stay fresh under a cake dome for about 2 days (if it lasts that long!). For longer storage, pop it in the fridge wrapped tightly for up to 5 days. To reheat, just warm slices in a 300°F oven for 10 minutes – the crust will crisp right back up!
Blueberry Pie Recipe FAQs
Can I use frozen blueberries?
Absolutely! I keep bags of frozen berries in my freezer year-round for emergency pie cravings. No need to thaw them first – just toss them frozen with the other filling ingredients. You might need to bake the pie 5-10 minutes longer since frozen berries chill the filling initially. The results are just as delicious as fresh!
How do I prevent a soggy bottom crust?
Ah, the eternal pie-maker’s dilemma! My three-pronged attack: 1) Make sure your bottom crust is properly chilled before filling, 2) Place your pie dish on a preheated baking sheet to give the bottom crust a heat boost, and 3) Don’t overdo the liquid in your filling – that cornstarch measurement is there for a reason! If you’re extra worried, you can brush the bottom crust with beaten egg white before adding the filling – it creates a moisture barrier.
Why did my filling turn out runny?
Usually this means either: 1) The pie needed longer to cool (those 3 hours are crucial for the filling to set!), 2) There wasn’t enough thickener (measure that cornstarch carefully!), or 3) The oven temp was too low, preventing proper thickening. Next time, try baking until you see thick, slow bubbles in the center – not just around the edges.
Can I make the dough ahead?
You bet! The dough disks keep beautifully in the fridge for 3 days, or can be frozen for up to 3 months. Just thaw overnight in the fridge if frozen, then let it soften slightly at room temp before rolling. I often make several batches of dough during berry season so I’m always pie-ready!
My lattice strips keep breaking – help!
No worries! If your dough cracks while weaving, just press it back together – the egg wash will hide most sins. For easier handling, make sure your dough isn’t too cold when rolling (let it sit at room temp for 5 minutes first) and use a bench scraper to transfer strips. Remember – imperfect lattices have character!
Nutritional Information
Now, let’s be real – nobody eats blueberry pie for its health benefits, but I know some of you like to keep track! Here’s the breakdown per slice (based on 8 servings), but remember these are estimates – your actual numbers will vary depending on berry sweetness, exact crust thickness, and whether you go for that extra scoop of ice cream (no judgement here!).
Each glorious slice packs about 380 calories, with 18g of fat (mostly from that heavenly butter in the crust). You’re looking at 25g of sugar – but hey, at least 3g of fiber from those beautiful berries! The crust contributes most of the 200mg sodium and 4g protein. And that 52g of carbs? Totally worth it when you’re biting into flaky, berry-filled perfection.
Important note: These values can swing quite a bit based on your specific ingredients. Using salted butter? That sodium goes up. Heavy-handed with the sugar? You’ll see it in the carb count. My advice? Enjoy your slice mindfully, savor every bite, and maybe take an extra walk tomorrow. Life’s too short not to eat the pie!
Share Your Blueberry Pie Experience
Did your pie turn out beautifully? Did you add your own twist? I’d love to hear about it! Leave a comment below or snap a photo of your masterpiece – nothing makes me happier than seeing your berry-filled creations!
PrintIrresistible Blueberry Pie Recipe with Shattering Crust

A classic homemade blueberry pie with a flaky crust and sweet-tart filling, perfect for summer desserts.
- Prep Time: 25 minutes
- Cook Time: 60 minutes
- Total Time: 1 hour 25 minutes
- Yield: 8 servings 1x
- Category: Dessert
- Method: Baking
- Cuisine: American
- Diet: Vegetarian
Ingredients
- 2 1/2 cups all-purpose flour
- 1 tbsp granulated sugar
- 1 tsp fine salt
- 1 cup (2 sticks) cold unsalted butter, cubed
- 6–8 tbsp ice water
- 6 cups blueberries (fresh or frozen)
- 3/4 cup granulated sugar
- 1/4 cup cornstarch
- 1 tbsp lemon juice
- 1 tsp lemon zest (optional)
- 1/2 tsp ground cinnamon (optional)
- 1/4 tsp salt
- 1 tbsp unsalted butter (for dotting)
- 1 egg (for egg wash)
- 1 tbsp milk or water
- 1–2 tbsp coarse sugar (optional)
Instructions
- Make the crust: In a large bowl, whisk flour, sugar, and salt. Cut in cold butter until pea-sized crumbs form. Add ice water 1 tbsp at a time just until dough comes together. Divide into two disks, wrap, and chill for at least 1 hour.
- Prep the oven: Preheat to 400°F. Place a baking sheet on the lower rack to catch drips.
- Make the filling: In a large bowl, toss blueberries with sugar, cornstarch, lemon juice, zest (if using), cinnamon (if using), and salt until evenly coated.
- Roll the bottom crust: Roll one dough disk into a 12-inch circle. Fit into a 9-inch pie dish, leaving a slight overhang.
- Fill the pie: Pour blueberry filling into the crust. Dot with 1 tbsp butter.
- Create the lattice: Roll the second disk into a 12-inch circle. Cut into 10–12 strips. Weave into a lattice over the filling. Trim and crimp edges.
- Egg wash: Whisk egg with milk/water. Brush over lattice and edges. Sprinkle coarse sugar if desired.
- Bake: Bake at 400°F for 20 minutes, then reduce to 350°F and bake 35–45 minutes more, until deeply golden and bubbling (shield edges with foil if browning too fast).
- Cool: Let cool at least 3 hours before slicing so the filling sets.
Notes
- Use cold butter for the flakiest crust.
- If using frozen blueberries, do not thaw before baking.
- Let the pie cool completely to allow the filling to thicken.
Nutrition
- Serving Size: 1 slice
- Calories: 380
- Sugar: 25g
- Sodium: 200mg
- Fat: 18g
- Saturated Fat: 11g
- Unsaturated Fat: 6g
- Trans Fat: 0g
- Carbohydrates: 52g
- Fiber: 3g
- Protein: 4g
- Cholesterol: 60mg
Keywords: blueberry pie recipe, homemade blueberry pie, flaky pie crust, lattice crust pie, classic fruit pie, summer dessert pie