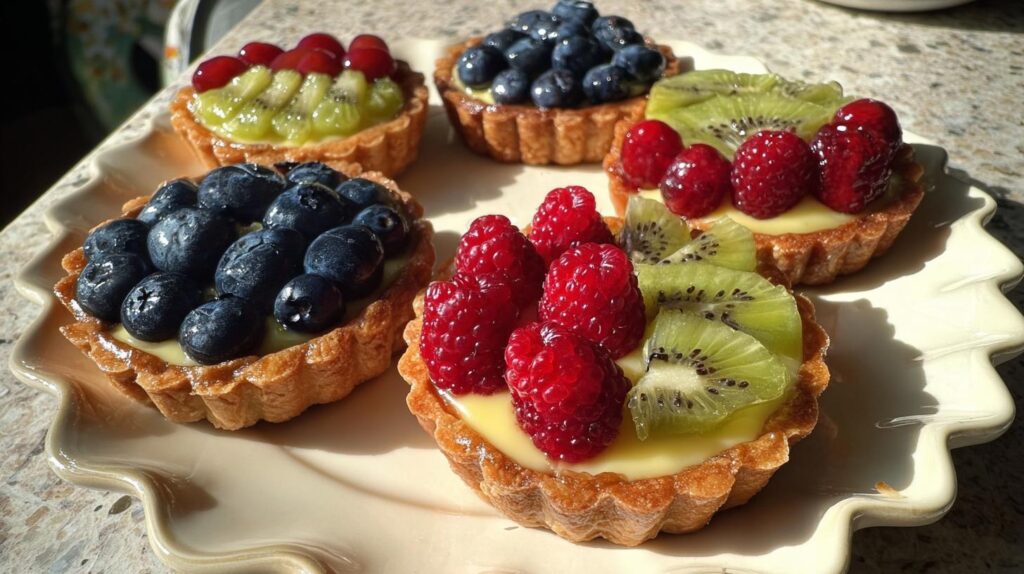
Oh my goodness, let me tell you about the first time I made fruit tartlets – what a delicious disaster that turned into my signature party dessert! I was hosting my first fancy tea party and wanted something that looked straight out of a Parisian patisserie. These little vanilla custard tarts topped with fresh berries and kiwi slices were my answer. Turns out, they’re way easier to make than they look (once you get past the first messy attempt!).
Now these mini fruit tarts are my go-to whenever I need something that says “I put in effort” without actually requiring pastry chef skills. They’re perfect for bridal showers, spring brunches, or just treating yourself on a Tuesday afternoon. The crisp buttery crust, smooth vanilla custard, and jewel-like fresh fruit make everyone feel fancy. And the best part? You can totally customize them with whatever fruit looks prettiest at the market!
Why You’ll Love These Fruit Tartlets
Listen, I know you’re going to fall head over heels for these little beauties – just like I did! Here’s what makes them absolutely irresistible:
- They look like you spent hours – but honestly? The golden crust and rainbow of fresh fruit make people think you bought them from a fancy bakery
- Perfect bite-sized portions – no awkward cake slicing, just grab-and-go cuteness (great for when you need privilege to sample all the flavors!)
- Not too sweet – the vanilla custard balances the tart berries, while the buttery crust keeps everything grounded
- Endless fruit options – swap berries for mango in summer, add pomegranate seeds in winter, or go wild with edible flowers
- Always a crowd favorite – I’ve brought these to baby showers, garden parties, and even casual potlucks where they disappeared first
Trust me, once you see how people’s faces light up when you bring out these fruit tartlets, you’ll be making them all season long!
Fruit Tartlets Ingredients
Alright, let’s gather our goodies! I like to organize everything by component because it makes the whole process smoother. Here’s what you’ll need for these gorgeous little tartlets:
- For the crust: 1 1/4 cups all-purpose flour (spooned and leveled), 1/4 cup powdered sugar (sifted, no lumps!), 1/2 teaspoon fine sea salt, 1/2 cup cold unsalted butter (cubed and kept in fridge until the last second), 1 large egg yolk (save the white for breakfast!), 2-3 tablespoons ice-cold water (I keep a glass in the freezer while prepping), 1/2 teaspoon pure vanilla extract
- For the custard: 1 1/2 cups whole milk (2% works in a pinch), 3 large egg yolks (see? we’re using them up!), 1/3 cup granulated sugar, 3 tablespoons cornstarch (the magic thickener), 1 tablespoon unsalted butter (room temp), 1 teaspoon vanilla extract (the good stuff), pinch of salt
- For topping: 2 kiwis (peeled and sliced thin), 1 cup blueberries (washed and dried), 1 cup raspberries (gently rinsed), 2 tablespoons apricot jam (for that glossy finish), 1 tablespoon water
Ingredient Substitutions & Notes
Don’t panic if you’re missing something – we can improvise! For the custard, you can use flour instead of cornstarch (double the amount), but it’ll be slightly less smooth. Dairy-free? Swap the butter for vegan butter sticks and use almond milk. No apricot jam? Any light-colored jelly works – I’ve used peach and even orange marmalade in a pinch!
Critical tip: Pat your fruit completely dry with paper towels after washing. Water droplets make the crust soggy, and nobody wants that. Also, if your berries are super tart, you can toss them with a teaspoon of sugar while prepping other ingredients.
How to Make Fruit Tartlets
Alright, let’s dive into the magic! These fruit tartlets come together in three simple (but important) steps. Follow along, and you’ll have a tray of gorgeous little desserts that’ll make you feel like a pastry pro!
Step 1: Prepare the Tart Dough
First, grab that cold butter from the fridge – we want it chilly! In a large bowl, whisk together the flour, powdered sugar, and salt. Now cut in the cold butter using a pastry cutter or your fingers until it looks like coarse crumbs with some pea-sized bits. Work quickly so the butter stays cold! Mix in the egg yolk and vanilla, then sprinkle in ice water one tablespoon at a time just until the dough comes together when pressed. Don’t overwork it! Form into a disc, wrap tightly in plastic (press it right against the dough), and chill for 30 minutes. This rest time is your secret to a flaky crust.
Step 2: Bake the Tart Shells
While the dough chills, preheat your oven to 350°F (175°C). Roll out the dough to about 1/8-inch thickness on a lightly floured surface. Cut circles slightly larger than your mini tart pans and gently press them in. Pro tip: Prick the bottoms all over with a fork to prevent puffing! Bake for 14-18 minutes until the edges are lightly golden. Let them cool completely in the pans – this keeps their perfect shape.
Step 3: Make the Vanilla Custard
Here’s where the magic happens! Heat the milk in a saucepan until steaming but not boiling. In a separate bowl, whisk together egg yolks, sugar, cornstarch, and salt until smooth. Slowly whisk in about 1/3 of the hot milk to temper the eggs, then pour everything back into the saucepan. Cook over medium heat, whisking constantly (!), until the custard thickens and coats the back of a spoon – about 3-5 minutes. Remove from heat and whisk in butter and vanilla. Cover with plastic wrap (press it right on the surface) and chill until set, about 1 hour. Trust me – this patience pays off with the creamiest filling!
Assembling & Serving Fruit Tartlets
Now for the fun part – making these little tartlets look absolutely irresistible! Spoon the chilled custard into your cooled tart shells, filling them about 3/4 full. Then comes the artistic freedom – arrange your fruit however your heart desires! I love doing concentric circles of kiwi slices with berries piled in the center, but you can go wild with patterns. For that professional bakery shine, gently warm the apricot jam with water and brush it over the fruit. Pro tip: Serve these beauties within 2 hours of assembling for that perfect crisp crust meeting the creamy custard. Watch how fast they disappear!
Fruit Tartlets Success Tips
After making dozens (okay, maybe hundreds) of these tartlets, I’ve learned a few tricks that guarantee perfect results every time:
- Chill that custard thoroughly – I know it’s tempting to rush, but warm custard makes soggy shells. Wait the full hour – your future self will thank you!
- Bring fruit to room temp – Cold fruit straight from the fridge “weeps” moisture onto your beautiful tarts. Let it sit out for 20 minutes first.
- Store empty shells airtight – They keep beautifully in a container for 2 days, so you can bake ahead for parties. Just don’t fill them until ready to serve.
- Use a light hand with glaze – Too much jam makes fruit slide around. Just a light brush gives that gorgeous sheen without the mess.
Follow these simple tips, and you’ll have tartlets that look like they came from a patisserie window!
Frequently Asked Questions
I get so many questions about these fruit tartlets – here are the answers to everything you might be wondering!
Can I make fruit tartlets ahead?
Absolutely! The shells keep beautifully in an airtight container for 2 days, and the custard lasts 3 days in the fridge (just keep that plastic wrap pressed on the surface). But here’s my golden rule: assemble them the day you’re serving. That way, the crust stays crisp and the fruit looks fresh. I usually prep everything the night before, then do the final assembly an hour before guests arrive.
What are your favorite fruit combinations?
Oh, this is where you can get creative! For classic vanilla custard tarts, you can’t beat the berries-and-kiwi combo I use here. But in summer, I adore mango slices with raspberries – the colors are stunning! In winter, try pomegranate arils with thinly sliced figs. For tea parties, sometimes I use just one type of berry arranged in pretty patterns. The key is choosing fruits that aren’t too juicy – soggy tarts are sad tarts!
How should I store leftovers?
Let’s be real – there usually aren’t any leftovers! But if you do have some, pop them in the fridge loosely covered and eat them the next day. The crust will soften a bit, but they’ll still taste delicious. I don’t recommend freezing these mini tart desserts – the custard separates when thawed. Pro tip: If you know you won’t finish them all, store extra unfilled shells and custard separately, then assemble fresh portions as needed!
Can I use frozen fruit?
I’d stick with fresh fruit for topping – frozen berries thaw too juicy and make everything soggy. But here’s a secret: frozen berries work great in the custard if you want to mix some in! Just thaw, drain well, and fold into the cooled custard before filling the shells. It makes a lovely “berry vanilla” twist that’s perfect for spring brunch recipes!
Nutritional Information
Just so you know what you’re biting into! These values are estimates per tartlet (about 3″ diameter). Actual nutrition will vary based on your specific ingredients and how generously you pile on that fruit!
- Calories: 260
- Sugar: 18g
- Fat: 12g
- Saturated Fat: 7g
- Carbohydrates: 34g
- Fiber: 2g
- Protein: 4g
Not too bad for such a decadent-tasting treat! The fresh fruit gives you some vitamins, and that vanilla custard packs protein from the eggs and milk. Everything in moderation, right?
Share Your Fruit Tartlets
I’d love to see your beautiful creations! Tag me on Instagram @bakingwithjoy so I can admire your fruit tartlet masterpieces. Or leave a star rating below – your feedback helps other bakers find this recipe. Happy baking!
PrintIrresistible 3-Step Fruit Tartlets That Wow Every Time

Mini fruit tarts with vanilla custard filling, topped with fresh berries and kiwi slices. Perfect for tea parties or spring brunch.
- Prep Time: 25 minutes
- Cook Time: 18 minutes
- Total Time: 43 minutes
- Yield: 10 mini tarts 1x
- Category: Dessert
- Method: Baked
- Cuisine: French
- Diet: Vegetarian
Ingredients
- 1 1/4 cups all-purpose flour
- 1/4 cup powdered sugar
- 1/2 teaspoon salt
- 1/2 cup cold unsalted butter, cubed
- 1 large egg yolk
- 2–3 tablespoons cold water
- 1/2 teaspoon vanilla extract
- 1 1/2 cups whole milk
- 3 large egg yolks
- 1/3 cup granulated sugar
- 3 tablespoons cornstarch
- 1 tablespoon unsalted butter
- 1 teaspoon vanilla extract
- Pinch of salt
- 2 kiwis, peeled and sliced
- 1 cup blueberries
- 1 cup raspberries
- 2 tablespoons apricot jam
- 1 tablespoon water
Instructions
- Make the tart dough: In a bowl, whisk flour, powdered sugar, and salt. Cut in cold butter until crumbly. Mix in egg yolk and vanilla, then add cold water until dough comes together. Form into a disc, wrap, and chill 30 minutes.
- Bake tart shells: Preheat oven to 350°F. Roll dough and press into mini tart pans. Prick bottoms with a fork. Bake 14–18 minutes until golden. Cool completely.
- Make the custard: Warm milk until steaming. Whisk egg yolks, sugar, cornstarch, and salt. Slowly whisk in warm milk. Return mixture to the pan and cook until thick (3–5 minutes). Remove from heat; whisk in butter and vanilla. Cover and chill.
- Assemble: Spoon custard into cooled tart shells. Top with kiwi, blueberries, and raspberries.
- Optional glaze: Warm apricot jam with water, then brush lightly over fruit. Chill 15 minutes before serving.
Notes
- Keep dough cold for flaky crust
- Press plastic wrap directly on custard surface to prevent skin
- Serve chilled for best texture
Nutrition
- Serving Size: 1 tart
- Calories: 260
- Sugar: 18g
- Sodium: 120mg
- Fat: 12g
- Saturated Fat: 7g
- Unsaturated Fat: 4g
- Trans Fat: 0g
- Carbohydrates: 34g
- Fiber: 2g
- Protein: 4g
- Cholesterol: 110mg
Keywords: fruit tartlets, vanilla custard tarts, fresh fruit tart, mini tart dessert, tea party desserts, spring brunch recipes