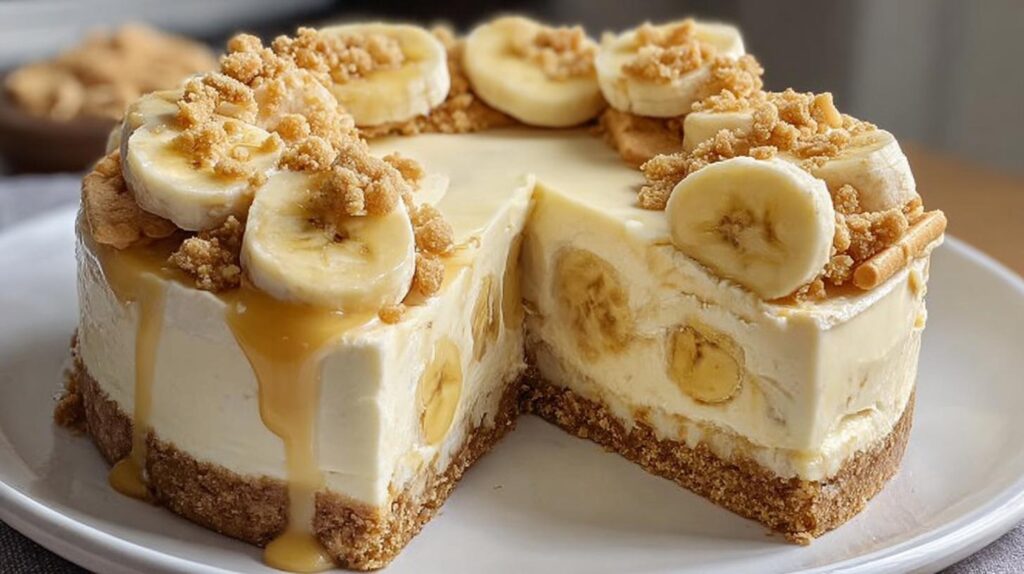
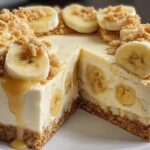
Oh my goodness, you have to try this no-bake banana pudding cheesecake! It’s my go-to dessert when I want something impressive but don’t feel like turning on the oven (which, let’s be honest, is most days). The first time I made it for a potluck, people went nuts – it’s got that perfect creamy texture we all love in cheesecake, but with the nostalgic flavor of banana pudding that reminds me of childhood summers. And here’s the best part: it comes together faster than you can say “Nilla Wafers!” Just mix, layer, chill, and boom – you’ve got a showstopper dessert that’ll have everyone begging for the recipe.
Why You’ll Love This No-Bake Banana Pudding Cheesecake
This dessert is seriously magical, and here’s why:
- No oven required – perfect for hot summer days or when you just can’t be bothered with baking
- Dreamy creamy texture that combines the best of cheesecake and banana pudding
- Make-ahead lifesaver – tastes even better after chilling overnight
- Total crowd-pleaser at potlucks, parties, or family dinners
- Kid-friendly but sophisticated enough for adults (my grandma AND my niece both rave about it!)
- Easy ingredients – probably already in your pantry right now
Trust me, one bite and you’ll be hooked! It’s like banana pudding and cheesecake had the most delicious baby.
Ingredients for No-Bake Banana Pudding Cheesecake
Alright, let’s talk ingredients! The beauty of this recipe is that most of these are pantry staples (or easy grabs at the grocery store). Here’s what you’ll need to create this creamy dream:
- 2 1/2 cups crushed vanilla wafers (Nilla Wafers work perfectly – I always grab an extra box for snacking)
- 6 tbsp unsalted butter, melted (salted works in a pinch, but reduce other salty ingredients)
- 2 tbsp granulated sugar (optional, but I like the extra sweetness in my crust)
- 16 oz cream cheese, softened to room temp (this is KEY for a smooth filling)
- 1 cup powdered sugar (sifted if you’re fancy, straight from the bag if you’re me)
- 1 (3.4 oz) box instant banana cream pudding mix (don’t grab the cook-and-serve by mistake!)
- 1 1/2 cups cold milk (whole milk makes it extra creamy, but 2% works too)
- 1 tsp vanilla extract (the good stuff if you’ve got it)
- 1 (8 oz) tub whipped topping, thawed (Cool Whip or generic both work fine)
- 1 cup crushed vanilla wafers (for those delicious cookie layers inside)
- 2 bananas, sliced (for layering – wait to slice these until you’re ready to assemble)
- 1–2 bananas, sliced (for that gorgeous topping right before serving)
- 1/2 cup crushed vanilla wafers or cookie crumble (for garnish – because pretty matters)
- 2–3 tbsp sweetened condensed milk or caramel drizzle (optional, but oh-so-worth-it)
See? Nothing too crazy! Just good, simple ingredients that come together like magic. Now let’s get mixing!
Equipment You’ll Need
Don’t worry – you don’t need fancy gadgets for this no-bake beauty! Here’s what I grab from my kitchen:
- 9-inch springform pan (the removable sides make serving SO easy)
- Mixing bowls (one for crust, one for filling – I use whatever’s clean!)
- Hand mixer or stand mixer (a whisk and strong arms could work in a pinch)
- Measuring cups and spoons
- Spatula (for scraping every last bit of that delicious filling)
- Food processor or ziplock bag + rolling pin (for crushing those wafers)
That’s it! Now let’s make some magic happen.
How to Make No-Bake Banana Pudding Cheesecake
Okay, let’s dive into making this dreamy dessert! I promise it’s easier than you think – just follow these simple steps and you’ll have a showstopper cheesecake that’ll impress everyone.
Preparing the Crust
First things first – let’s make that buttery Nilla Wafer crust! Grab your food processor (or a trusty ziplock bag and rolling pin) and crush those vanilla wafers until you’ve got fine crumbs. Mix them with melted butter and that optional sugar if you’re feeling fancy. The mixture should hold together when you pinch it – if it’s too dry, add a smidge more butter.
Now press this heavenly mixture firmly into the bottom of your springform pan. I like to use the bottom of a measuring cup to really pack it down evenly. Pop it in the fridge for about 15 minutes to set while you make the filling. This chilling time makes all the difference for a crust that holds together beautifully!
Making the Filling
Here’s where the magic happens! In a medium bowl, whisk together the instant banana pudding mix and cold milk for a good 2 minutes until it’s nice and thick. Let it sit for about 5 minutes – this helps it set up perfectly.
Meanwhile, beat your softened cream cheese (seriously, room temp is crucial here!) with powdered sugar until it’s smooth as silk. Add the vanilla and give it another quick mix. Now comes the fun part – slowly add your thickened pudding to the cream cheese mixture, beating until everything is gloriously creamy and well combined.
Gently fold in the whipped topping until you’ve got this fluffy, cloud-like filling that’ll make you want to eat it by the spoonful (no judgment if you sneak a taste!).
Assembling the Cheesecake
Time to build our masterpiece! Spread half of that dreamy filling over your chilled crust. Now sprinkle some crushed vanilla wafers over the top – about 1/2 cup should do it. Next comes a layer of banana slices (use one banana here). Try to arrange them evenly so every slice gets banana goodness!
Top with the remaining filling, smoothing it out beautifully. I like to use an offset spatula for this, but the back of a spoon works just fine too. Now comes the hard part – patience!
Chilling and Serving
Cover your cheesecake and refrigerate for at least 6 hours, though overnight is even better. This chilling time lets everything set up perfectly so you get clean slices.
Right before serving, add those fresh banana slices on top (this prevents browning), sprinkle with remaining crushed wafers, and drizzle with sweetened condensed milk or caramel if you’re feeling extra indulgent. Carefully remove the springform ring, slice with a warm knife (run it under hot water and dry between cuts), and prepare for the compliments to roll in!
Tips for the Perfect No-Bake Banana Pudding Cheesecake
After making this cheesecake more times than I can count, I’ve learned a few tricks that make all the difference!
- Use ripe bananas – those speckled ones with brown spots pack the most flavor without being mushy
- Chill like you mean it – that full 6 hours (or overnight) isn’t just a suggestion – it’s what gives you clean slices
- Slice bananas last minute to prevent ugly browning (a squeeze of lemon helps if you must prep ahead)
- Room temp cream cheese is non-negotiable – take it out at least 2 hours before mixing
- Press that crust firmly – I use a measuring cup to really pack it down tight
- For extra stability, add 1/4 tsp xanthan gum to the filling (my secret weapon for hot weather!)
Follow these simple tips and you’ll have a dessert that looks as amazing as it tastes!
Ingredient Substitutions and Variations
One of my favorite things about this recipe is how easily you can switch things up based on what you have or your mood! Here are some delicious twists I’ve tried:
- Pudding swap: Try vanilla or butterscotch pudding for a different flavor profile (my kids love chocolate pudding version!)
- Crust alternatives: Graham crackers, shortbread cookies, or even gingersnaps make fantastic bases
- Dairy-free option: Use coconut milk and vegan cream cheese – it works surprisingly well
- Extra crunch: Mix chopped pecans or walnuts into the crust or sprinkle on top
- Fruit variations: Layer in sliced strawberries or pineapple chunks with the bananas
The possibilities are endless – make it your own and have fun with it! Just don’t skip the chilling time – that’s one step that’s not negotiable.
Serving and Storage Suggestions
This no-bake beauty is best served chilled straight from the fridge – the colder it is, the cleaner your slices will be! Leftovers (if you’re lucky enough to have any) keep beautifully covered in the fridge for 2-3 days. Just wait to add those fresh banana slices on top until right before serving each time to keep them looking fresh. Pro tip: Store individual slices in airtight containers for grab-and-go treats – they make amazing lunchbox surprises!
Nutritional Information
Here’s the scoop on what you’re getting in each delicious slice (based on 12 servings):
- Calories: 390
- Sugar: 30g
- Sodium: 280mg
- Fat: 22g (12g saturated, 8g unsaturated)
- Carbohydrates: 42g
- Fiber: 1g
- Protein: 6g
- Cholesterol: 45mg
Remember – these numbers can vary based on exact ingredients used (like different brands of pudding mix or whipped topping). If you’re watching specific nutrients, feel free to tweak ingredients to fit your needs – more bananas for potassium, less sugar if you prefer tartness, etc. It’s your cheesecake adventure!
Frequently Asked Questions
Can I Make This Cheesecake Ahead of Time?
Absolutely! This no-bake banana pudding cheesecake is practically MADE for making ahead. In fact, I always prepare mine the night before because that long chill time makes it even better. The flavors have time to mingle and the texture becomes perfectly firm. Just hold off on adding the final banana slices and cookie crumbles until right before serving so they stay fresh-looking.
What Can I Use Instead of Nilla Wafers?
No Nilla Wafers? No problem! Graham crackers work beautifully for the crust (use about 2 cups crushed). For the inside layers, try shortbread cookies or even animal crackers for that nostalgic flavor. In a real pinch, I’ve used golden Oreos (scrape out the filling first) and it was delicious – just know the flavor will be slightly different but still amazing!
How Do I Prevent Soggy Bananas?
Here’s my trick: slice your bananas just before assembling, and give them a quick toss with a teaspoon of lemon juice if you’re extra worried about browning. For the layers inside the cheesecake, make sure they’re not touching the pan edges where moisture collects. And that thick cheesecake filling actually protects them pretty well – I’ve never had a sogginess issue when I follow the recipe exactly!
Share Your No-Bake Banana Pudding Cheesecake Experience
I’d love to hear how your cheesecake turns out! Did you add any fun twists? Maybe your family went crazy for it like mine does? Drop a comment below with your experience (or any brilliant variations you tried). Better yet – snap a photo of your masterpiece and tag me! Nothing makes me happier than seeing your kitchen creations. Happy no-baking, friends!
PrintIrresistible No-Bake Banana Pudding Cheesecake in 15 Minutes
A creamy no-bake cheesecake combining banana pudding and vanilla wafers for a delicious dessert.
- Prep Time: 25 minutes
- Cook Time: 0 minutes
- Total Time: 6 hours 25 minutes
- Yield: 12 slices 1x
- Category: Dessert
- Method: No-Bake
- Cuisine: American
- Diet: Vegetarian
Ingredients
- 2 1/2 cups crushed vanilla wafers (Nilla Wafers)
- 6 tbsp unsalted butter, melted
- 2 tbsp granulated sugar (optional)
- 16 oz cream cheese, softened
- 1 cup powdered sugar
- 1 (3.4 oz) box instant banana cream pudding mix
- 1 1/2 cups cold milk
- 1 tsp vanilla extract
- 1 (8 oz) tub whipped topping (Cool Whip), thawed
- 1 cup crushed vanilla wafers (for inside layers)
- 2 bananas, sliced (for inside layers)
- 1–2 bananas, sliced (for topping)
- 1/2 cup crushed vanilla wafers (or cookie crumble)
- 2–3 tbsp sweetened condensed milk or caramel drizzle (optional)
Instructions
- Mix crushed vanilla wafers with melted butter (and sugar if using). Press firmly into the bottom of a 9-inch springform pan. Chill for 15 minutes.
- Whisk pudding mix with cold milk for 2 minutes until thickened. Set aside 5 minutes.
- Beat cream cheese and powdered sugar until smooth. Mix in vanilla.
- Add the thickened pudding to the cream cheese mixture and beat until fully blended and creamy.
- Gently fold in whipped topping until fluffy and smooth.
- Spread half the filling over the crust. Sprinkle some crushed wafers and add a layer of banana slices. Add remaining filling and smooth the top.
- Cover and refrigerate at least 6 hours (overnight is best) until set.
- Top with banana slices, cookie crumbles, and a drizzle of condensed milk/caramel if desired. Slice cold and serve.
Notes
- Use ripe bananas for best flavor.
- Chill thoroughly for easier slicing.
- Store leftovers covered in the fridge.
Nutrition
- Serving Size: 1 slice
- Calories: 390
- Sugar: 30g
- Sodium: 280mg
- Fat: 22g
- Saturated Fat: 12g
- Unsaturated Fat: 8g
- Trans Fat: 0g
- Carbohydrates: 42g
- Fiber: 1g
- Protein: 6g
- Cholesterol: 45mg
Keywords: no-bake banana pudding cheesecake, banana cream cheesecake, no bake cheesecake recipe, nilla wafer crust dessert, southern banana pudding dessert, easy make ahead party dessert