Let me tell you about my favorite “cheat” dessert – this no-bake chocolate crunch delight that always disappears faster than I can make it! When my niece begged for something chocolatey last summer and my kitchen was too hot for baking, I threw together this layered miracle. The magic? That irresistible combo of fudgy base, pillowy cream, and crispy chocolate topping that comes together without ever turning on the oven. Now it’s my go-to when friends pop over unexpectedly or when I need a sweet fix FAST. Trust me, you’ll want to keep these ingredients stocked once you taste how the creamy layer melts into that crunchy chocolate heaven.
Why You’ll Love This No-Bake Chocolate Crunch Dessert
This dessert isn’t just easy – it’s pure magic in every bite. Here’s why it’s become my secret weapon:
- No oven needed – perfect for hot days or when you’re just too impatient to bake
- 20-minute hands-on time means you’re basically eating chocolate heaven before your oven would’ve even preheated
- That CRUNCH from the puffed rice topping against the creamy layer? Absolute perfection
- Customizable richness – add that hazelnut spread when you’re feeling fancy (you won’t regret it)
- Always a crowd-pleaser – I’ve never brought this to a potluck without getting recipe requests
Seriously, it’s like eating a chocolate bar, brownie, and mousse all in one glorious dessert.
Ingredients for No-Bake Chocolate Crunch Dessert
Here’s everything you’ll need to create those dreamy layers – I’ve broken it down so you can see exactly what goes into each part of this addictive dessert. Pro tip: measure everything before starting (my “oops” moment when I ran out of cream mid-whipping taught me this lesson!).
For the Fudgy Base:
- 1 packet (about 7 oz) chocolate cake or brownie crumbs – or crushed chocolate cookies if that’s what you’ve got (I’ve used everything from Oreos to leftover cake trimmings!)
- 3 tbsp melted butter – unsalted is my go-to, but salted adds a nice contrast if that’s your jam
- 2 tbsp cocoa powder – Dutch-processed gives extra richness, but regular works perfectly too
For the Cream Layer:
- 1 1/2 cups cold heavy cream – straight from the fridge is crucial for perfect peaks (I even chill my bowl sometimes!)
- 2 tbsp powdered sugar – sifted if you’re feeling fancy, but let’s be real, I usually skip that step
- 1 tsp vanilla extract – the good stuff makes a difference here
For the Chocolate Crunch Topping:
- 1 1/4 cups milk chocolate – chips or chopped bars (semi-sweet works if you prefer less sweetness)
- 1 1/2 cups puffed rice cereal – the star of our crunchy show!
- 2 tbsp hazelnut spread (optional) – my secret weapon for next-level richness (but the dessert is still amazing without it)
See? Nothing crazy – just pantry staples that come together in the most magical way. The hazelnut spread is genuinely optional (I’ve forgotten it before and nobody complained!), but when I add it, people always ask “what’s that amazing extra flavor?”
Equipment You’ll Need
Here’s the beautiful part – you probably already have everything needed for this no-bake wonder! My kitchen isn’t fancy, and neither are the tools for this recipe:
- Medium mixing bowl – for combining that dreamy fudgy base
- Hand mixer or whisk – though I’ve used a fork in a pinch when my mixer disappeared (thanks, kids!)
- Spatula – my trusty silicone one gets every last bit of chocolate into the pan
- 8×8 glass dish – or whatever baking pan you’ve got, really
That’s it! No special gadgets required – just basic tools that make cleanup a breeze.
How to Make No-Bake Chocolate Crunch Dessert
Alright, let’s get to the fun part – assembling this chocolate lover’s dream! I promise it’s easier than you think, and I’ll walk you through each step just like I do with my best friend when she calls me panicking about dessert emergencies (which happens more often than you’d think).
Step 1: Prepare the Fudgy Base
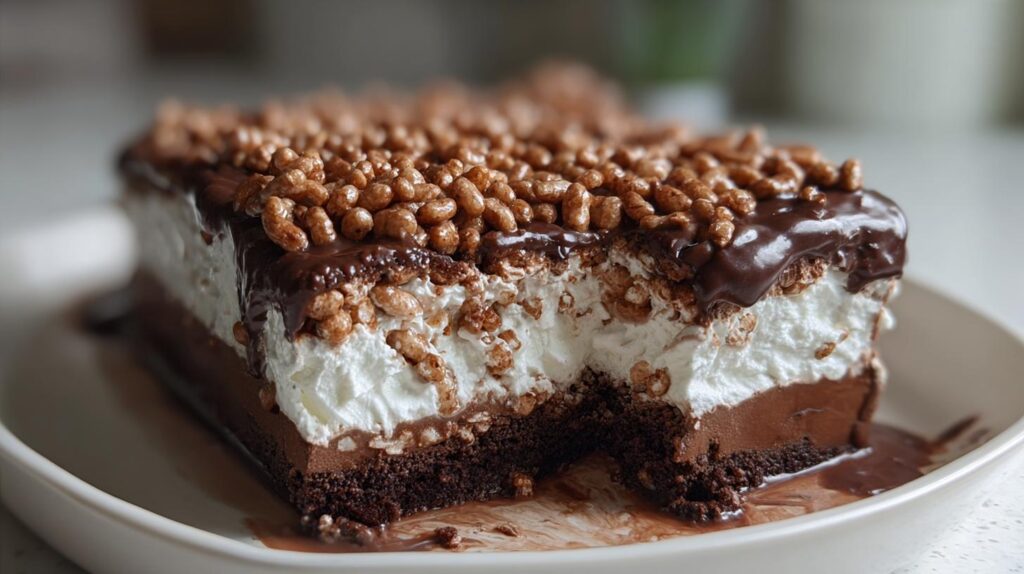
First things first – that irresistible chocolatey foundation! In your mixing bowl, combine the chocolate crumbs, cocoa powder, and melted butter. Mix until it looks like wet sand – you’ll know it’s ready when you can pinch some between your fingers and it holds together. Now, dump it into your dish and press firmly with your fingers or the back of a spoon. Really pack it down – this prevents crumbly disasters when slicing later. I sometimes use a small glass to get those edges nice and tight!
Step 2: Whip the Cream Layer
Here’s where things get dreamy! Pour your cold heavy cream into a chilled bowl (about 10 minutes in the freezer does the trick). Add the powdered sugar and vanilla, then whip until you get stiff peaks that hold their shape when you lift the beaters. Pro tip: don’t walk away – overwhipping turns it grainy (learned that the hard way during a phone distraction!). Spread this cloud of deliciousness evenly over your fudgy base – gentle swoops with the spatula make it look extra pretty.
Step 3: Make the Chocolate Crunch Topping
Time for the pièce de résistance! Melt your chocolate (microwave in 30-second bursts, stirring between, or use a double boiler if you’re feeling fancy). Stir in the hazelnut spread if using – this is when my kitchen starts smelling like a chocolatier’s workshop. Fold in the puffed rice cereal until every piece is coated, then spread this crispy goodness over the cream layer. Work quickly before the chocolate sets, and don’t press too hard – we want to keep that airy crunch!
Step 4: Chill and Serve
Now comes the hardest part – waiting! Pop your creation in the fridge for at least 2 hours (I know, torture). This lets all those glorious layers set properly. When it’s time to serve, run a warm knife under hot water and dry it before slicing for picture-perfect pieces. The contrast between the crunchy top, creamy middle, and fudgy base? Absolute dessert nirvana!
Tips for the Perfect No-Bake Chocolate Crunch Dessert
After making this dessert more times than I can count (okay fine, I may have a slight addiction), here are my foolproof tricks for perfection:
- Chill your bowl before whipping cream – cold tools = faster, fluffier peaks
- Line your dish with parchment – makes lifting out slices a breeze
- Press that base firmly – no crumbly disasters on your watch!
- Let chocolate cool slightly before adding cereal – keeps the crunch intact
- Slice with a warm knife (wiped dry!) for Instagram-worthy clean cuts
These little touches take it from “good” to “can I have the whole pan?” territory!
Variations and Substitutions
The beauty of this dessert is how easily it adapts to what you’ve got! Swap in gluten-free cookie crumbs for the base if needed – I’ve used gluten-free Oreos with perfect results. Prefer dark chocolate? Go for it – just know it’ll be less sweet (I add an extra tbsp of hazelnut spread to balance). Nut-free? Skip the hazelnut spread or use sunflower seed butter instead. For the cereal, cornflakes make a fun crunch if you’re out of puffed rice. See? No excuses not to make this tonight!
Serving and Storage
This dessert is best served cold – I like to pull it from the fridge about 5 minutes before slicing so the chocolate topping has just a slight snap to it. That warm knife trick? Absolute game-changer for clean cuts! Just dip your knife in hot water, wipe it dry, and slice smoothly through those gorgeous layers. Leftovers (if you’re lucky enough to have any!) keep beautifully covered in the fridge for up to 3 days – though mine never lasts that long. Pro tip: layer parchment between slices if stacking them in a container to prevent sticking!
Nutritional Information
Each indulgent slice of this no-bake chocolate crunch dessert comes in at about 370 calories – totally worth it for that perfect bite of fudgy, creamy, crunchy goodness! Here’s the breakdown per serving: 22g fat (13g saturated), 35g carbs (2g fiber), and 4g protein. Remember, these numbers can vary based on your specific ingredients – like using dark chocolate instead of milk or skipping the hazelnut spread. But let’s be honest, we’re not eating this for the nutrition – we’re eating it for pure chocolate bliss!
Frequently Asked Questions
I get asked about this no-bake chocolate crunch dessert all the time – here are the most common questions that pop up (usually while people are licking their plates clean!):
Can I use whipped topping instead of heavy cream?
You bet! While I love the richness of real whipped cream, frozen whipped topping works in a pinch. Just thaw it first and skip the sugar/vanilla since it’s already sweetened. The texture will be slightly different, but still delicious.
How long does this dessert keep in the fridge?
It stays perfect for 3 days if you can resist eating it all at once! The puffed rice might soften slightly by day 3, but that fudgy base just gets better. Cover tightly with plastic wrap to prevent fridge smells.
Can I make this gluten-free?
Absolutely! Just use gluten-free chocolate cookies or cake crumbs for the base. I’ve even used crushed gluten-free pretzels for a salty-sweet twist – so good!
What if I don’t have puffed rice cereal?
No worries – cornflakes, crispy rice cereal, or even crushed pretzels make great crunchy substitutes. The key is something light that won’t get soggy under that chocolate blanket.
Can I freeze this layered dessert?
I don’t recommend it – the whipped cream layer gets icy and the textures change. This treat is best enjoyed fresh from the fridge anyway!
Ready to Make This No-Bake Chocolate Crunch Dessert?
Now that you’ve got all my secrets, I can’t wait for you to experience the magic of this dessert! There’s nothing like that first bite when the creamy layer meets the crispy chocolate topping. Tag me if you share your creations – I love seeing what chocolatey masterpieces you whip up!
Print20-Minute No-Bake Chocolate Crunch Dessert to Bliss

This no-bake layered treat is pure indulgence with its creamy filling, fudgy base, and crunchy chocolate topping—an easy dessert idea that’s dangerously addictive!
- Prep Time: 20 minutes
- Cook Time: 0 minutes
- Total Time: 2 hours 20 minutes
- Yield: 9 servings 1x
- Category: Dessert
- Method: No-Bake
- Cuisine: International
- Diet: Vegetarian
Ingredients
- For the Fudgy Base:
- 1 packet (about 7 oz) chocolate cake or brownie crumbs (or crushed chocolate cookies)
- 3 tbsp melted butter
- 2 tbsp cocoa powder
- For the Cream Layer:
- 1 1/2 cups cold heavy cream
- 2 tbsp powdered sugar
- 1 tsp vanilla extract
- For the Chocolate Crunch Topping:
- 1 1/4 cups milk chocolate (or semi-sweet), melted
- 1 1/2 cups puffed rice cereal
- 2 tbsp hazelnut spread (optional, for richness)
Instructions
- Mix cake crumbs, cocoa powder, and melted butter until it resembles wet sand. Press into the bottom of a glass dish to create that easy brownie-like foundation for your ultimate layered dessert.
- Whip cold heavy cream, powdered sugar, and vanilla until fluffy peaks form. Spread over the base evenly for a light but luscious middle layer—perfect texture contrast.
- In a bowl, mix melted chocolate and hazelnut spread until smooth. Stir in puffed rice cereal. This layer brings next-level texture and chocolatey crunch factor.
- Spread the crispy chocolate mixture over the whipped cream layer. Use a spatula to smooth it out evenly—this is your showstopper topping that seals the deal.
- Refrigerate the dessert for at least 2 hours before serving to set those layers. Slice and serve cold for the best no-bake crowd-pleaser you’ve ever made!
Notes
- Refrigerate for at least 2 hours before serving.
- Hazelnut spread is optional but adds richness.
- Use cold heavy cream for best whipping results.
Nutrition
- Serving Size: 1 slice
- Calories: 370
- Sugar: 25g
- Sodium: 120mg
- Fat: 22g
- Saturated Fat: 13g
- Unsaturated Fat: 7g
- Trans Fat: 0g
- Carbohydrates: 35g
- Fiber: 2g
- Protein: 4g
- Cholesterol: 45mg
Keywords: No-Bake Chocolate Crunch Dessert, Layered chocolate dessert, Easy no-bake treat, Puffed rice chocolate bars, Whipped cream chocolate slice, Fudgy no-bake dessert, No-bake dessert with cereal